Instant Pot Thit Kho (Vietnamese Braised Pork and Eggs)


Thịt kho is classic Vietnamese comfort food. Pork slowly braised until tender, eggs soaking up a savory-sweet caramel sauce, and everything spooned over a bowl of rice. It’s the kind of dish that’s meant to be cozy, familiar, and made in a big pot so there’s always leftovers.

This Instant Pot version keeps the same flavors you expect, but cuts down the cooking time significantly. You still get tender meat and rich sauce, just without having to watch a pot on the stove for hours.
Why Make Thit Kho in the Instant Pot?
The Instant Pot makes thit kho easier to cook on a regular weeknight.
Pressure cooking breaks down the pork quickly while keeping it juicy. The sauce develops flavor fast, especially when you take a few extra steps like browning the meat and letting it naturally release. It’s a great option when you want the comfort of traditional thịt kho but need it done on a weeknight.
If you’re used to stovetop thit kho, this version will feel familiar, just faster.

What Is Thit Kho?
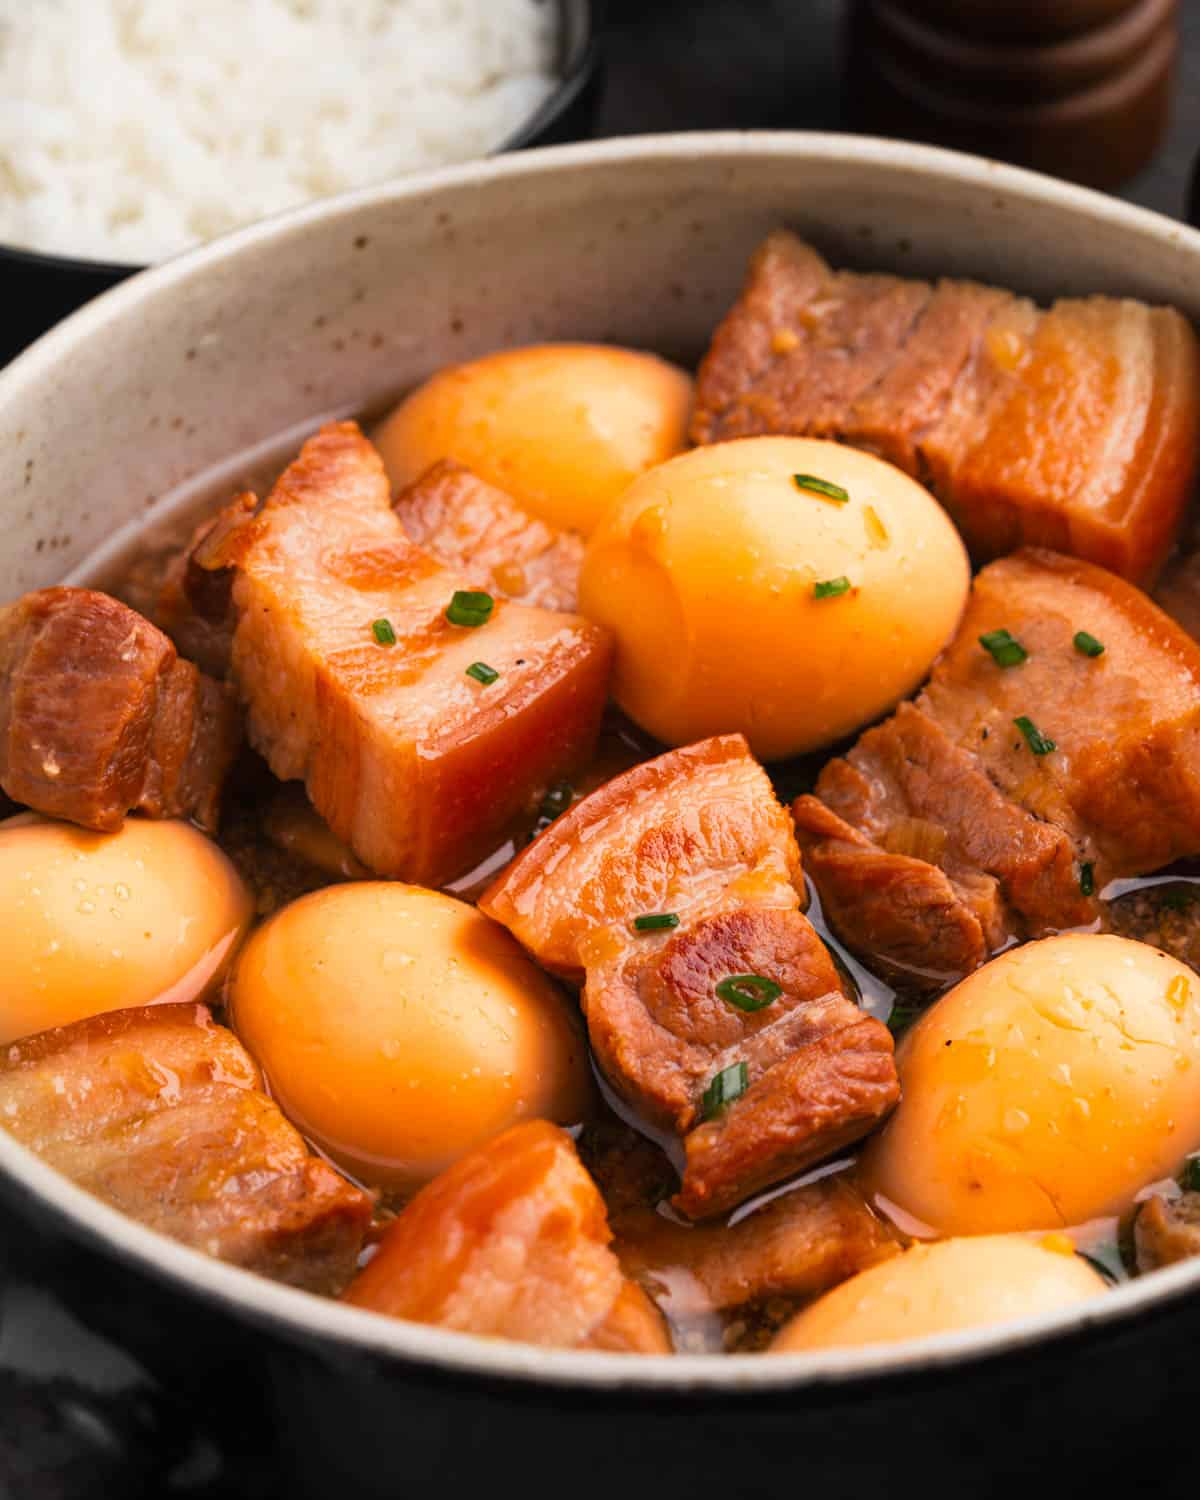
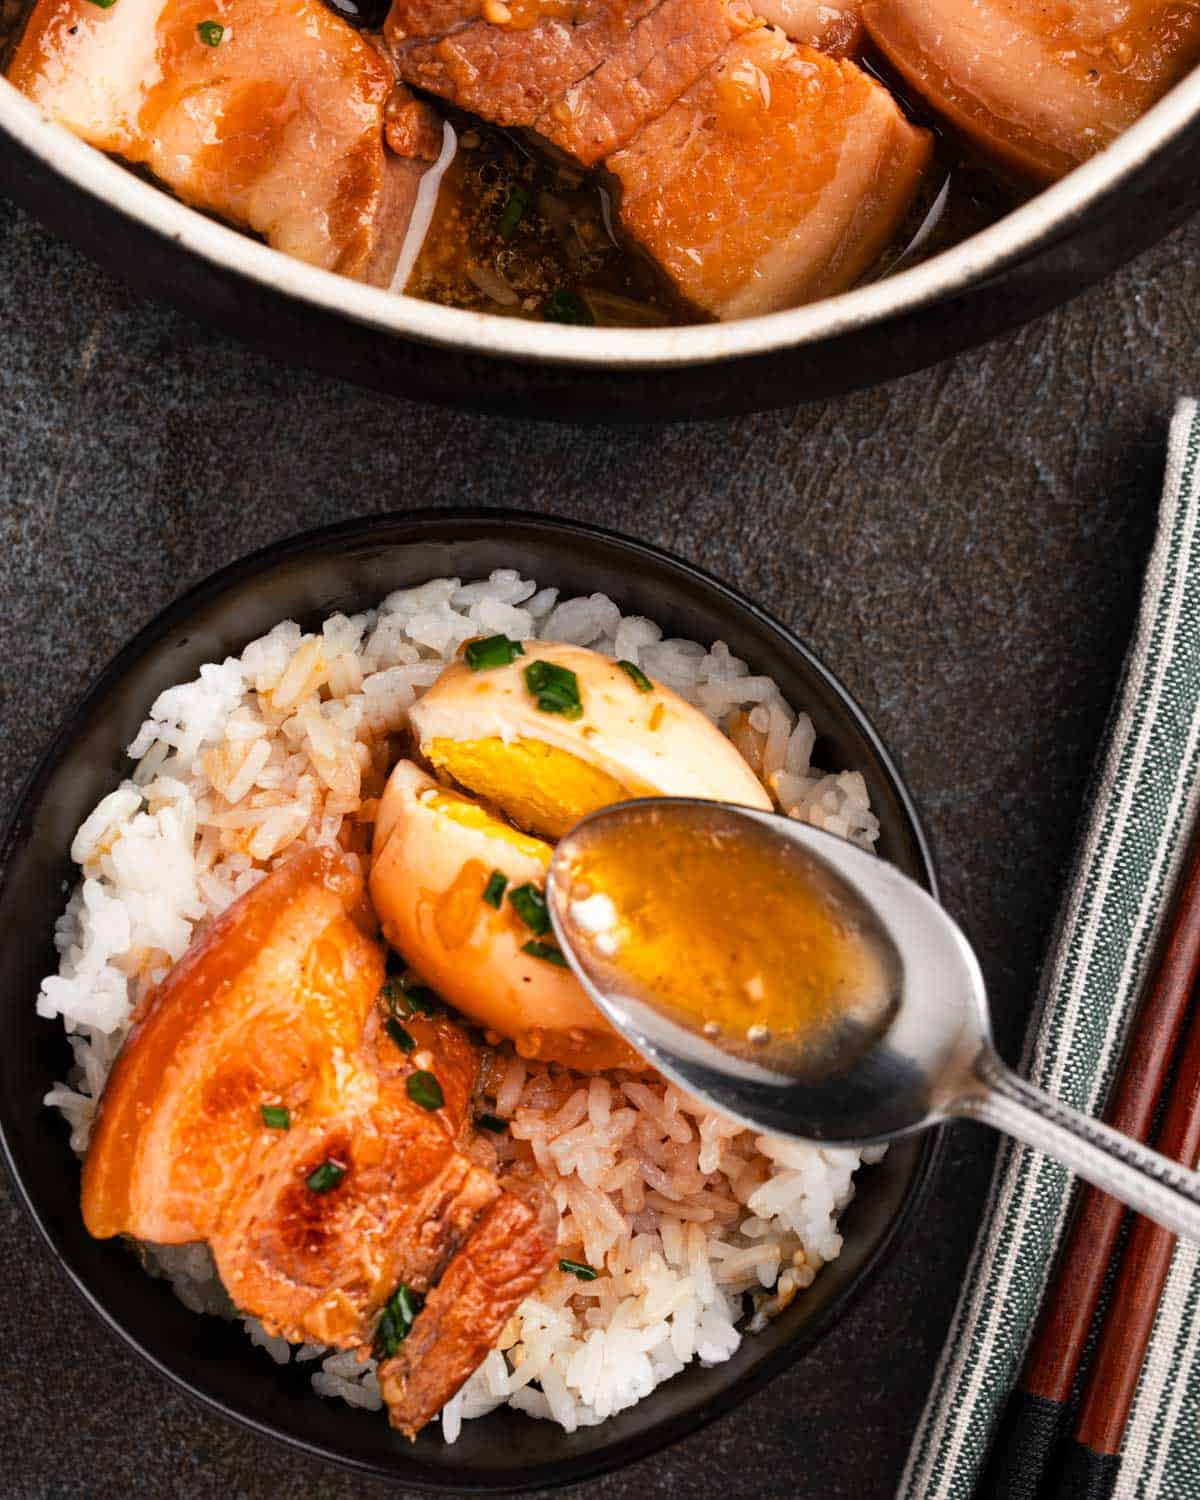
Thit kho is a Vietnamese braised pork dish cooked with eggs in a savory-sweet caramel sauce. It’s commonly served with rice and shows up often at family meals, holidays, and Lunar New Year.
Every family has their own way of making it. Some versions are sweeter, some darker, some heavier on coconut. The base flavors stay the same, and this version keeps things balanced and approachable.
What Cut of Pork Should You Use?
Pork belly is the most traditional choice. The fat renders as it cooks, keeping the meat tender and giving the sauce that glossy, rich finish.
Pork shoulder is a great option too if you want more meat with a little less fat. I often use a mix of pork belly and pork shoulder so you get a good balance of richness and meaty texture in every bite.
Avoid very lean cuts, since they tend to dry out even with pressure cooking. Cut the pork into larger chunks so it holds its shape after cooking.
Ingredients and Flavor Notes
The caramel sauce is what gives thit kho its signature color and subtle sweetness. If you want to understand this step better, my Vietnamese caramel sauce (nuoc mau) post breaks it down in detail.
Please scroll ⬇️ to the recipe card for the full ingredient amounts and instructions.
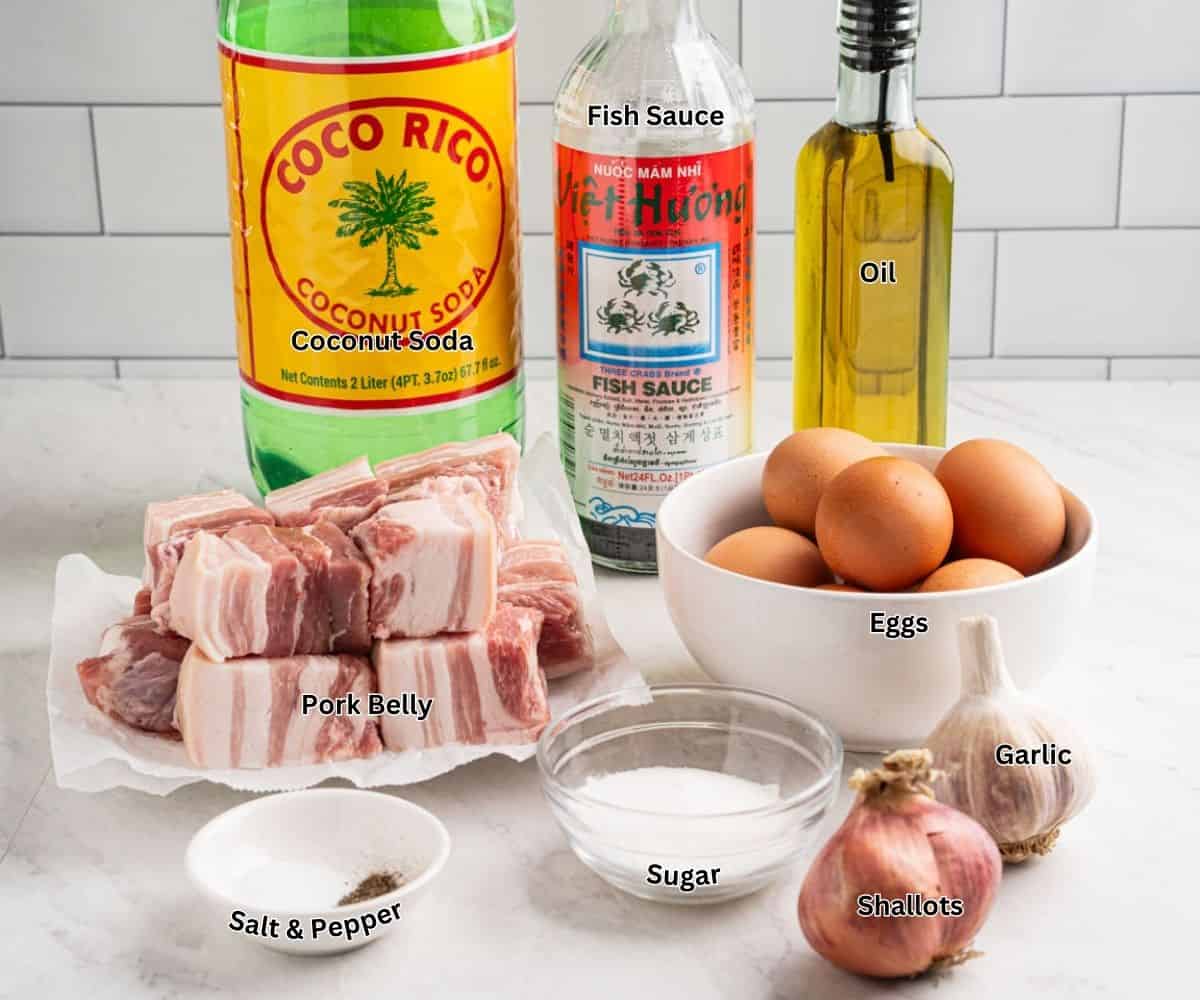
Fish sauce brings depth and umami, while soy sauce rounds things out. Coconut soda adds light sweetness and body to the braising liquid without making the dish taste like coconut.
Eggs are added at the end so they absorb the sauce without overcooking.
Substitutions and Variations
You can swap the pork for beef or chicken if needed. Beef chuck works best, and chicken thighs hold up better than breasts.
Instead of regular hard-boiled eggs, you can use quail eggs or soft-boiled eggs. Add them at the very end so they don’t overcook.
If you don’t have fish sauce, Maggi seasoning or soy sauce can be used instead. The flavor will be slightly different but still balanced.
Coconut soda can be replaced with water, Coca-Cola, or 7Up. Coconut soda gives the most traditional flavor, but the others work well in a pinch.
How to Make Instant Pot Thit Kho (Overview)
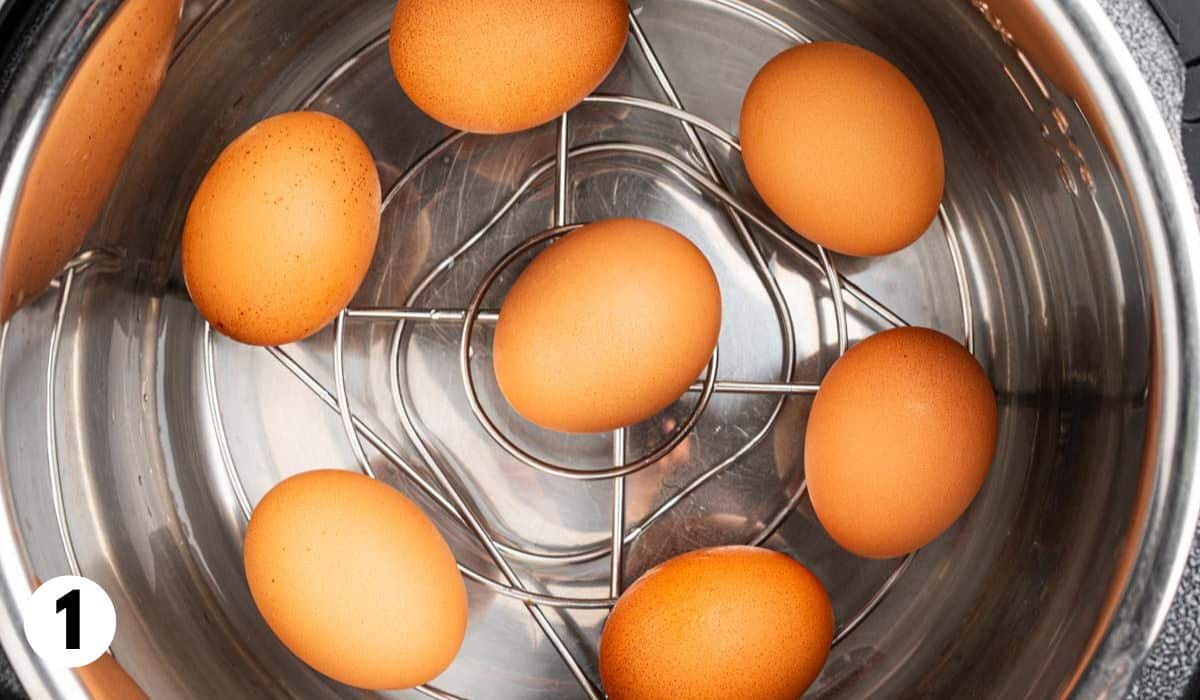
Start by cooking the eggs and setting them aside.
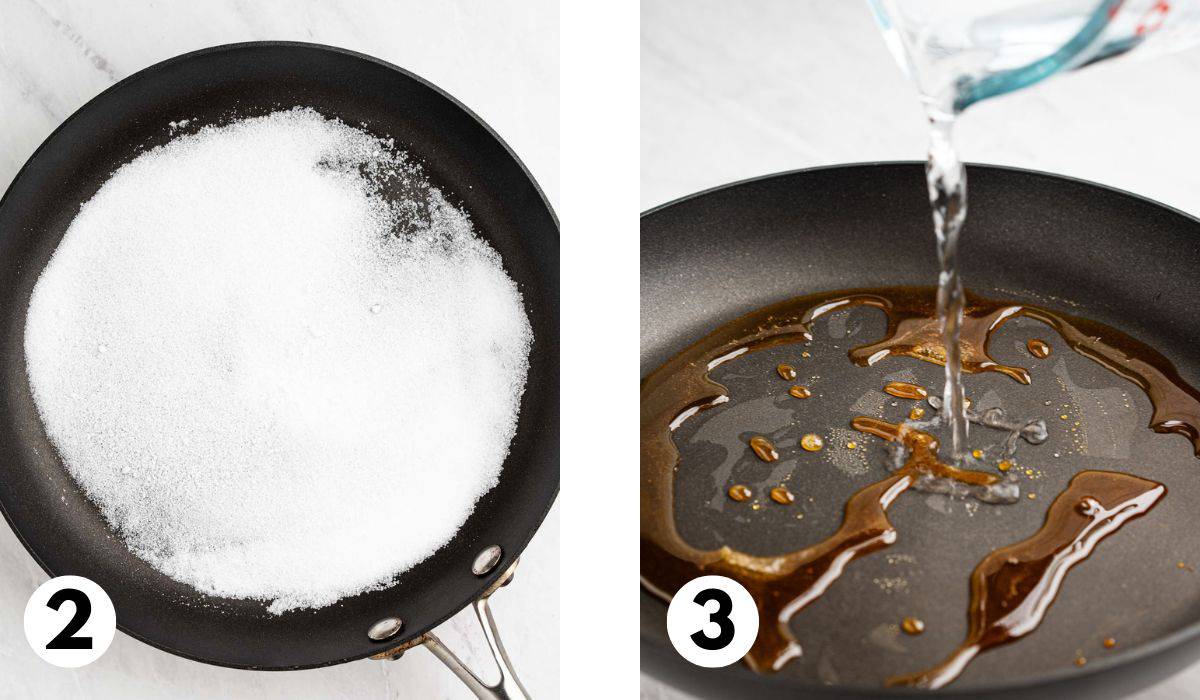
Make the caramel sauce separately so you have full control over the color. Once it reaches a deep amber, remove it from heat and set aside.
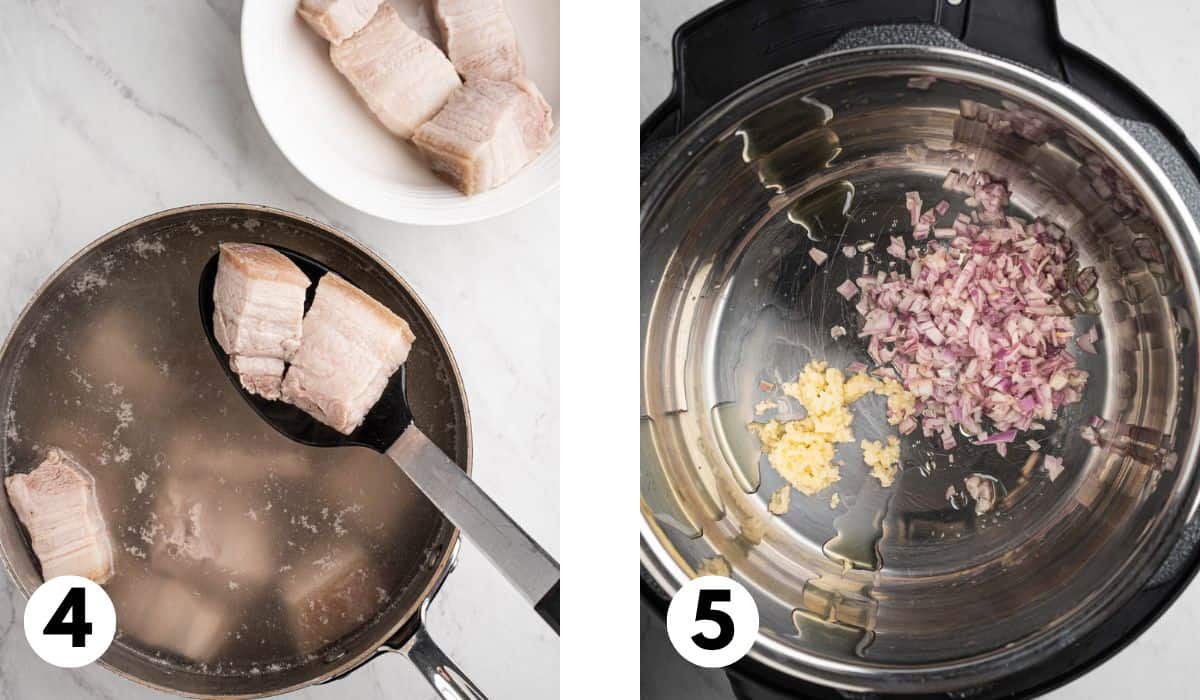
Parboil the pork briefly, then rinse and dry it well. This step helps keep the final sauce clean and clear.
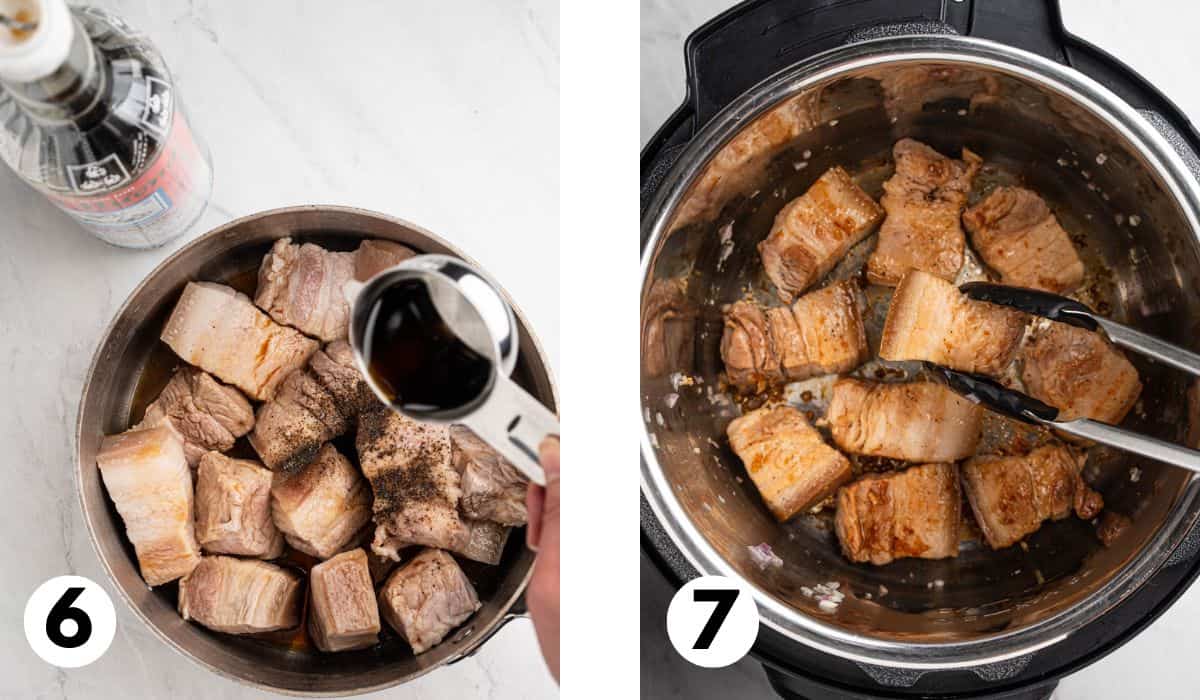
Marinate the pork so it absorbs flavor before cooking.
For best results, brown the pork and aromatics in a separate pan, then transfer everything to the Instant Pot. This gives better browning and avoids scorching.
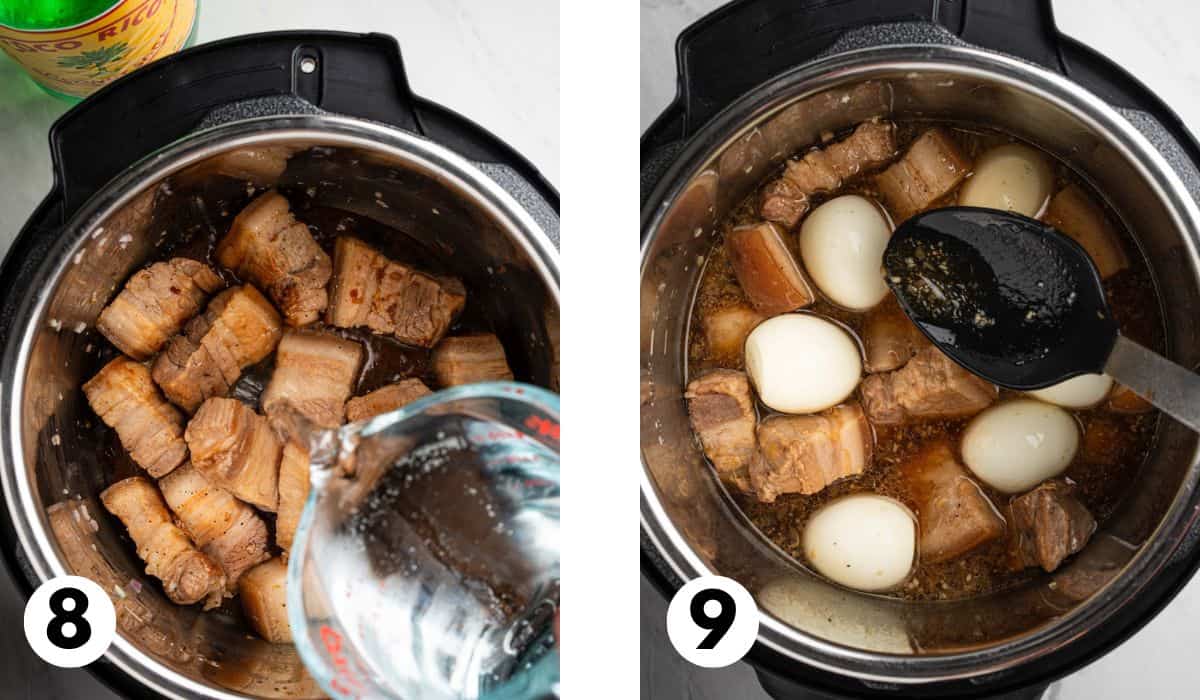
Deglaze thoroughly once the liquid is added. Those browned bits add a lot of flavor.
Pressure cook, then allow a natural release. This is important for tender meat.
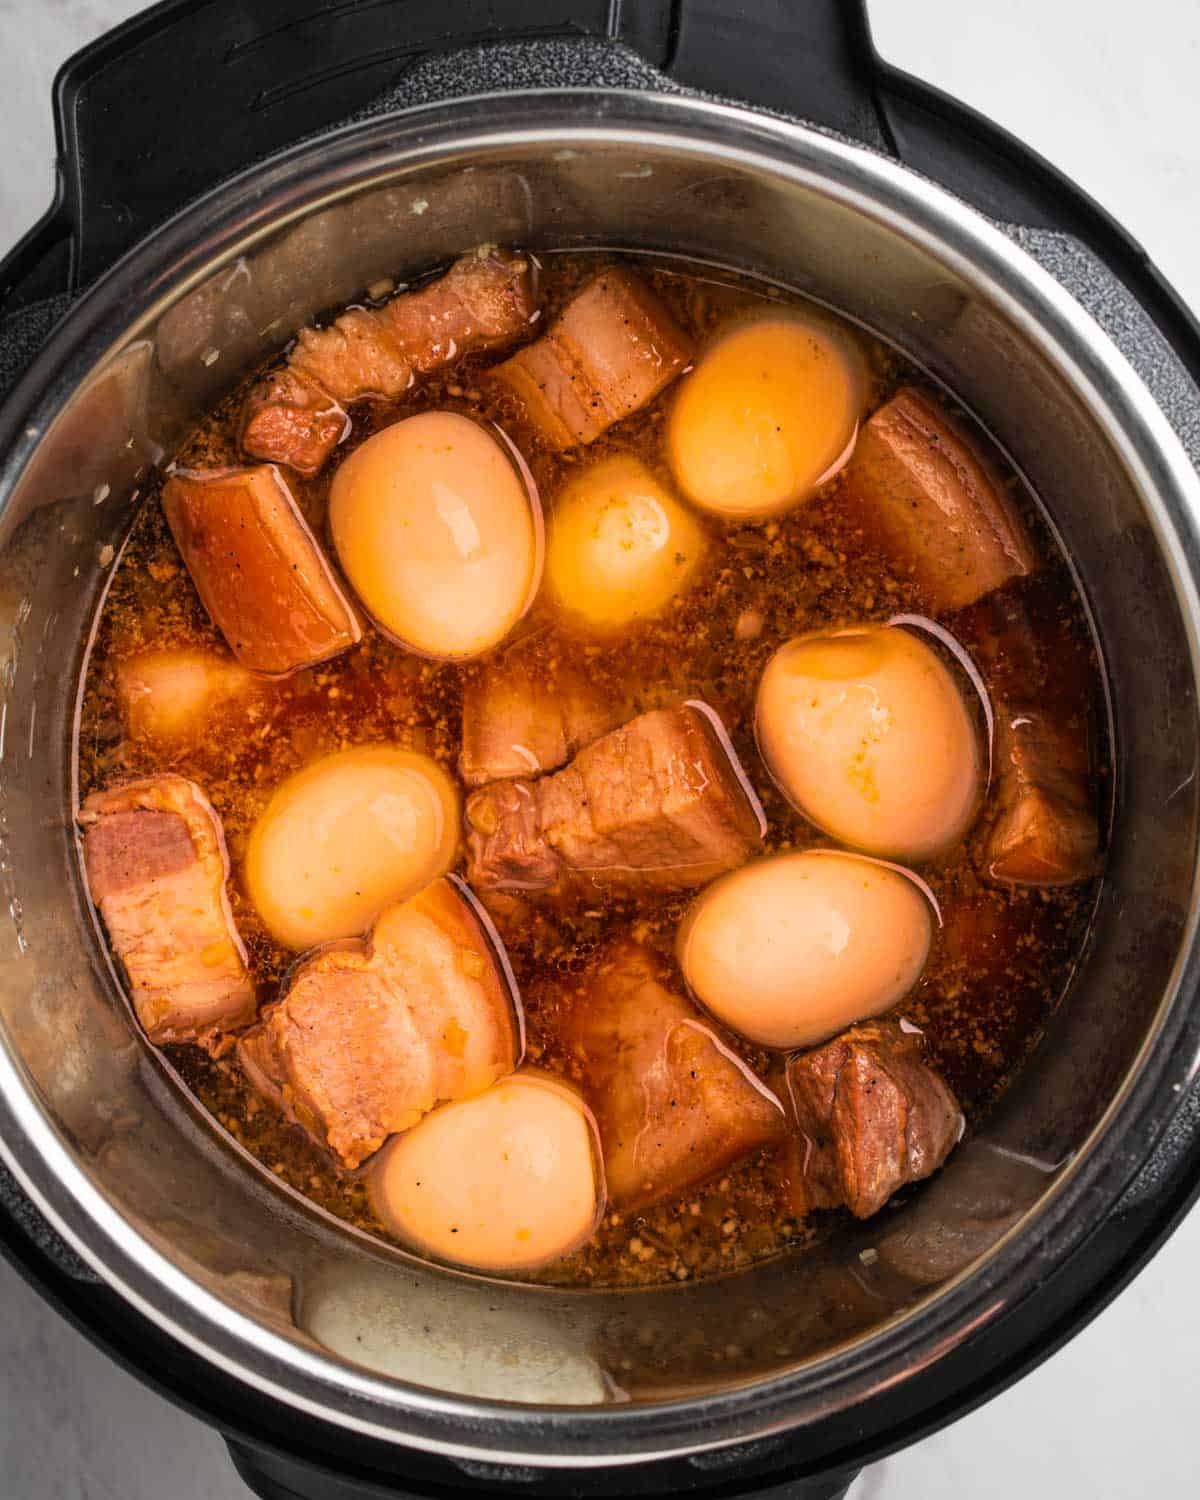
Finish by simmering the eggs briefly in the sauce so they soak up flavor.
Exact measurements and timing are in the recipe card below.
Tips for the Best Instant Pot Thit Kho
✔️ Marinate the pork, even if only briefly. It makes a noticeable difference.
✔️ Don’t skip browning. It’s optional, but highly recommended. Browning in a separate pan gives better color and flavor.
✔️ Always deglaze the pot completely before pressure cooking.
✔️ Use natural release instead of quick release so the meat stays tender.
✔️ Taste and adjust at the end. The sauce should be savory with a gentle sweetness, not overly salty or sweet.
What to Serve with It
Thit kho is best served with plain steamed rice so the sauce can really shine.
For something fresh on the side, Vietnamese pickled carrots and daikon help balance the richness. If you’re serving a bigger meal, adding cha gio or a simple vegetable like stir-fried water spinach (rau muong) works well.
Leftover sauce is great spooned over rice or mixed into vegetables the next day.
Storage Tips
Store leftovers in an airtight container in the fridge for up to 4 days.
Reheat gently on the stove or in the microwave. Add a splash of water if the sauce thickens too much.
This dish also freezes well for up to 2 months. Thaw overnight in the fridge before reheating.
Make It This Week
If you’ve been wanting to make Vietnamese braised pork but felt intimidated by the time commitment, this Instant Pot version is a great place to start. It delivers the same comfort and flavor with far less hands-on time.
If you try it, leave a comment and let me know how it turned out. And if it’s a recipe you’ll want to make again, save it on Pinterest so it’s easy to come back to later.
RECIPE

Instant Pot Thịt Kho (Vietnamese Braised Pork and Eggs)
Equipment
- Instant Pot (Pressure Cooker)
Ingredients
For the Caramel Sauce
- 3 tablespoons sugar
- ⅓ cup water
For the Pork and Eggs
- 2 pounds pork belly or shoulder, cut into 1½ inch cubes
- 1 teaspoon salt (or chicken bouillon powder or mushroom seasoning)
- ½ teaspoon black pepper
- 1 tablespoon caramel sauce (from above, adjust to taste)
- 3 tablespoons fish sauce (adjust to taste)
- 1 tablespoons soy sauce or Maggi Seasoning (adjust to taste)
- ½ tablespoon olive oil
- 2 shallots, finely diced
- 3 garlic cloves, minced
- 1 cup coconut soda (such as Coco Rico)
- 1 cup water
- 8 hard-boiled eggs, peeled
For Serving
- Steamed rice
Instructions
- Cook the eggs. Add 1 cup of water to the Instant Pot and place eggs on a trivet. Pressure cook on High for 6 minutes. Quick release, then transfer eggs to an ice bath. Peel and set aside.
- Make the caramel sauce. In a small saucepan, combine sugar and water. Bring to a simmer without stirring. Cook until the color turns deep amber. Carefully add a small splash of water to stop the cooking. Set aside.
- Parboil the pork. Bring a pot of water to a boil. Add pork and boil for 3–4 minutes to remove impurities. Drain, rinse with cold water, and pat dry.
- Marinate the pork. In a bowl, combine pork with salt, pepper, caramel sauce, fish sauce, and soy sauce. Let marinate for at least 15 minutes.
- Sauté aromatics. Set the Instant Pot to Sauté. Add olive oil, shallots, and garlic. Cook for 1–2 minutes until fragrant. Remove and set aside.
- Brown the pork. For best results, brown the pork in a separate skillet over medium-high heat. Sear in batches for 1–2 minutes per side, avoiding overcrowding. This prevents steaming and helps avoid scorching the Instant Pot. Transfer browned pork to the Instant Pot and repeat with remaining pieces.
- Deglaze and pressure cook. Add the coconut soda and water to the pan used to brown the pork, scraping up any browned bits. Transfer everything to the Instant Pot along with the pork and aromatics. Seal the lid and pressure cook on High for 6 minutes, then allow a natural release for 10–15 minutes.
- Add eggs and finish. Open the lid and add peeled eggs. Switch to Sauté mode and simmer for 2–3 minutes so the eggs absorb the sauce. Taste and adjust seasoning as needed.
- Serve. Serve warm with steamed rice and spoon extra sauce over the pork and eggs.
Notes
- Marinate the pork: Pressure cooking is fast, which means the pork does not have as much time to absorb flavor. Even a short marinade helps the seasoning penetrate the meat before cooking.
- Brown in a separate pan: This gives better color and flavor and helps avoid scorching the Instant Pot.
- Do not skip deglazing: Scrape up all browned bits before pressure cooking to prevent burn warnings.
- Use natural release: Letting the pressure release naturally keeps the pork tender.
- Taste at the end: Adjust with fish sauce or a small pinch of sugar as needed.
- Add eggs last: This allows them to soak up the sauce without overcooking.


Hi, can I make this in a 6 quartz instant pot? Thanks
Hi Leesa! Yes, you can. I actually tested and made this recipe in a 6-quart Instant Pot, so it works just fine.
Hi Quynh, the flavor of this dish suits my and my family’s taste. Thank you! I find that it takes me about 2 hours to follow the steps in this recipe, though. I’ll try sauteeing the aromatics in a separate small pan because I find that after doing this in the instant pot, even after adding an extra tablespoon of oil before searing, the pork searing leaves a thick black residue on the pot bottom that requires a lot of scraping and there are black specks everywhere in the sauce. Also, I cook the eggs for 8 minutes in the Instant Pot because after 5 minutes the eggs are too soft for me to peel properly.
Hi Hoan! Thank you so much for sharing such thoughtful feedback. I’m really glad the flavors worked well for you and your family.
I appreciate you pointing out the timing and the pot issue too. I prefer searing everything in a separate pan before adding it to the instant pot too. And thanks for sharing your egg timing as well. 8 minutes is a helpful tip for anyone who prefers firmer eggs that are easier to peel.
I really appreciate you taking the time to share what worked for you. Feedback like this is so helpful for other readers and for me too. Thanks again!
Hi Quynh, I am confused with the “Pressure Cook” instructions. Do you mean we add in the left over marinade or do we add extra caramel sauce? Thank you
Hi Dan, I’m sorry for any confusion! The marinade includes salt, pepper, 1 tablespoon of caramel sauce, and fish sauce. Start by searing the marinated pork on all sides in two batches to get a nice crust, then add everything back into the pot before pressure cooking.
Once it’s done, you can adjust the flavors to your liking by adding more caramel sauce or additional seasoning. I hope this helps clarify—let me know if you have any other questions!