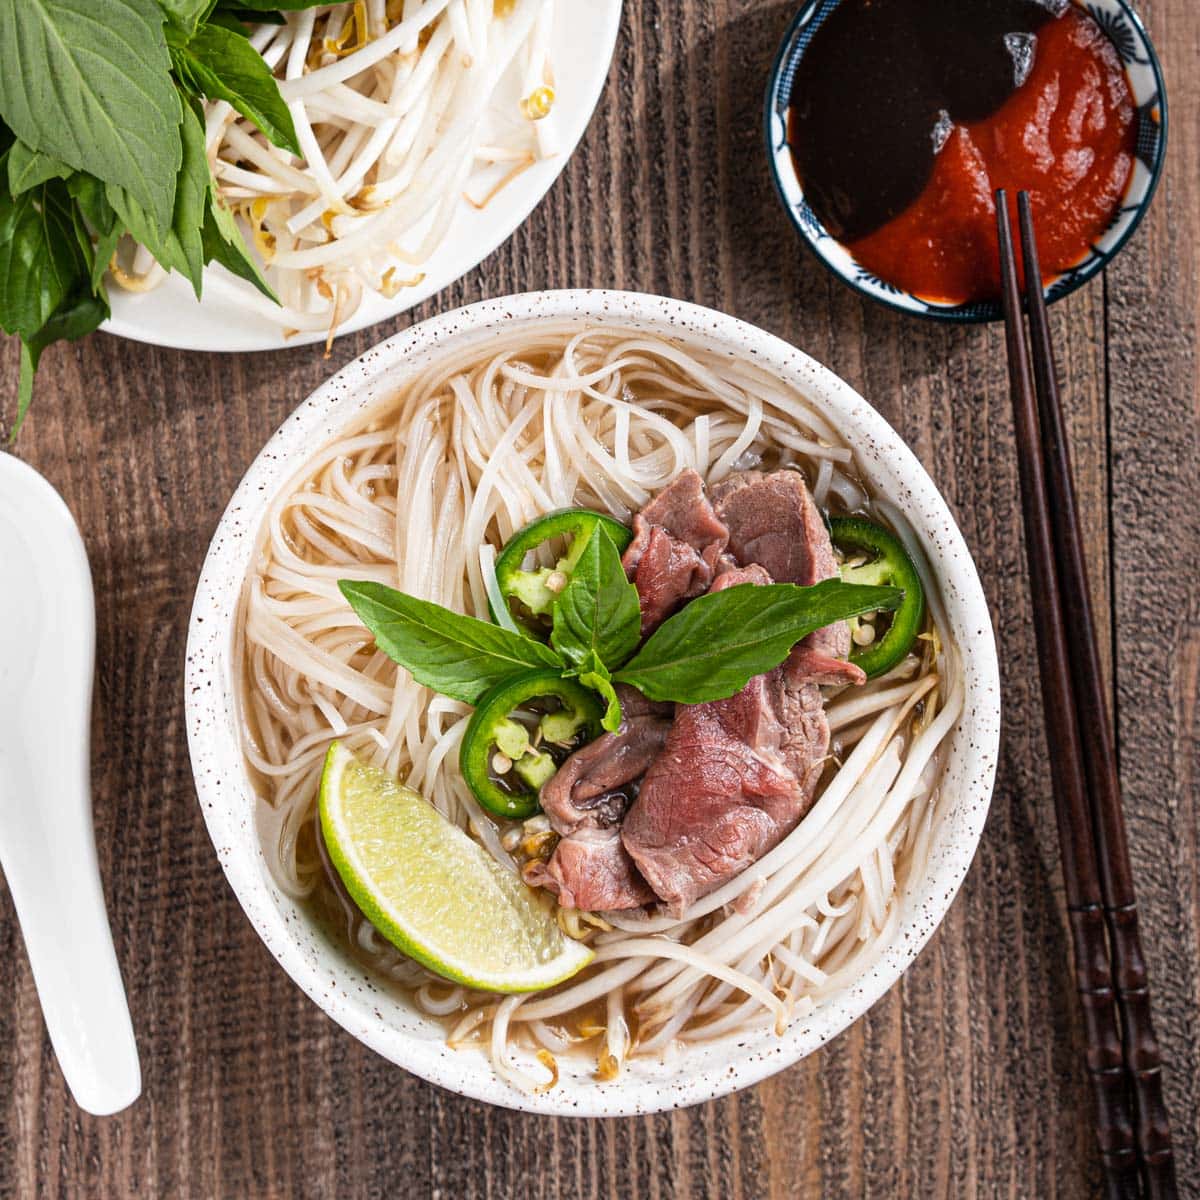
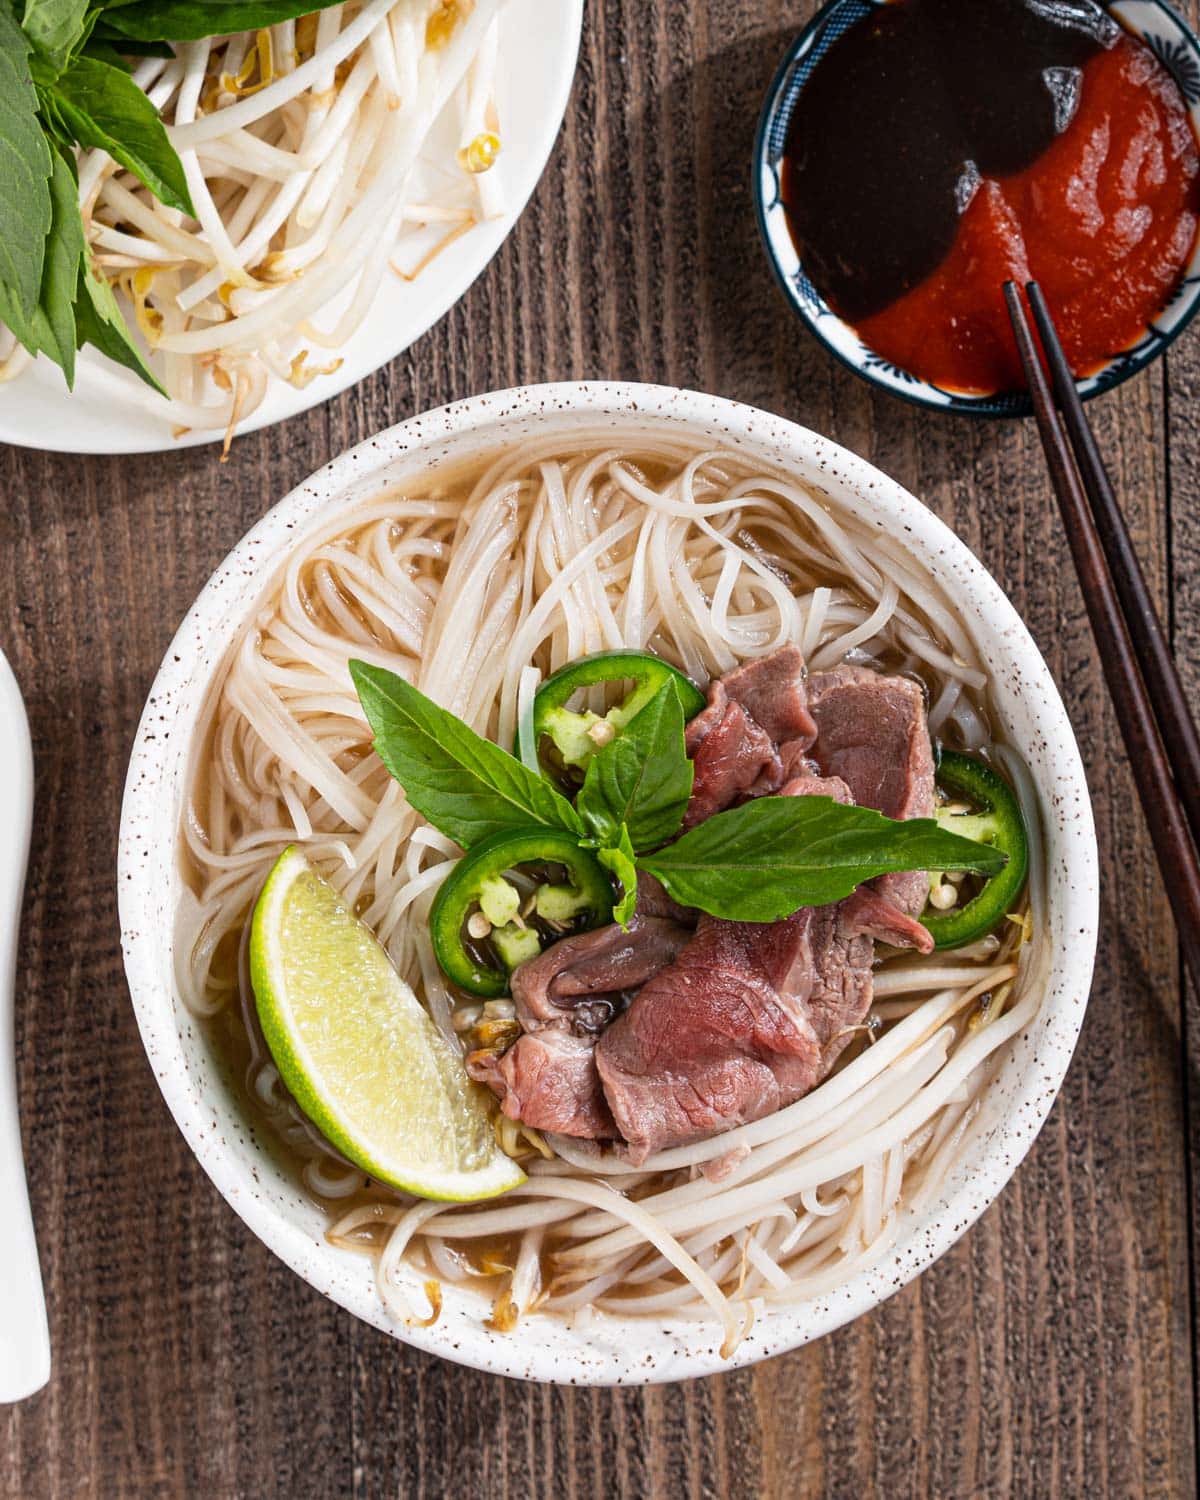
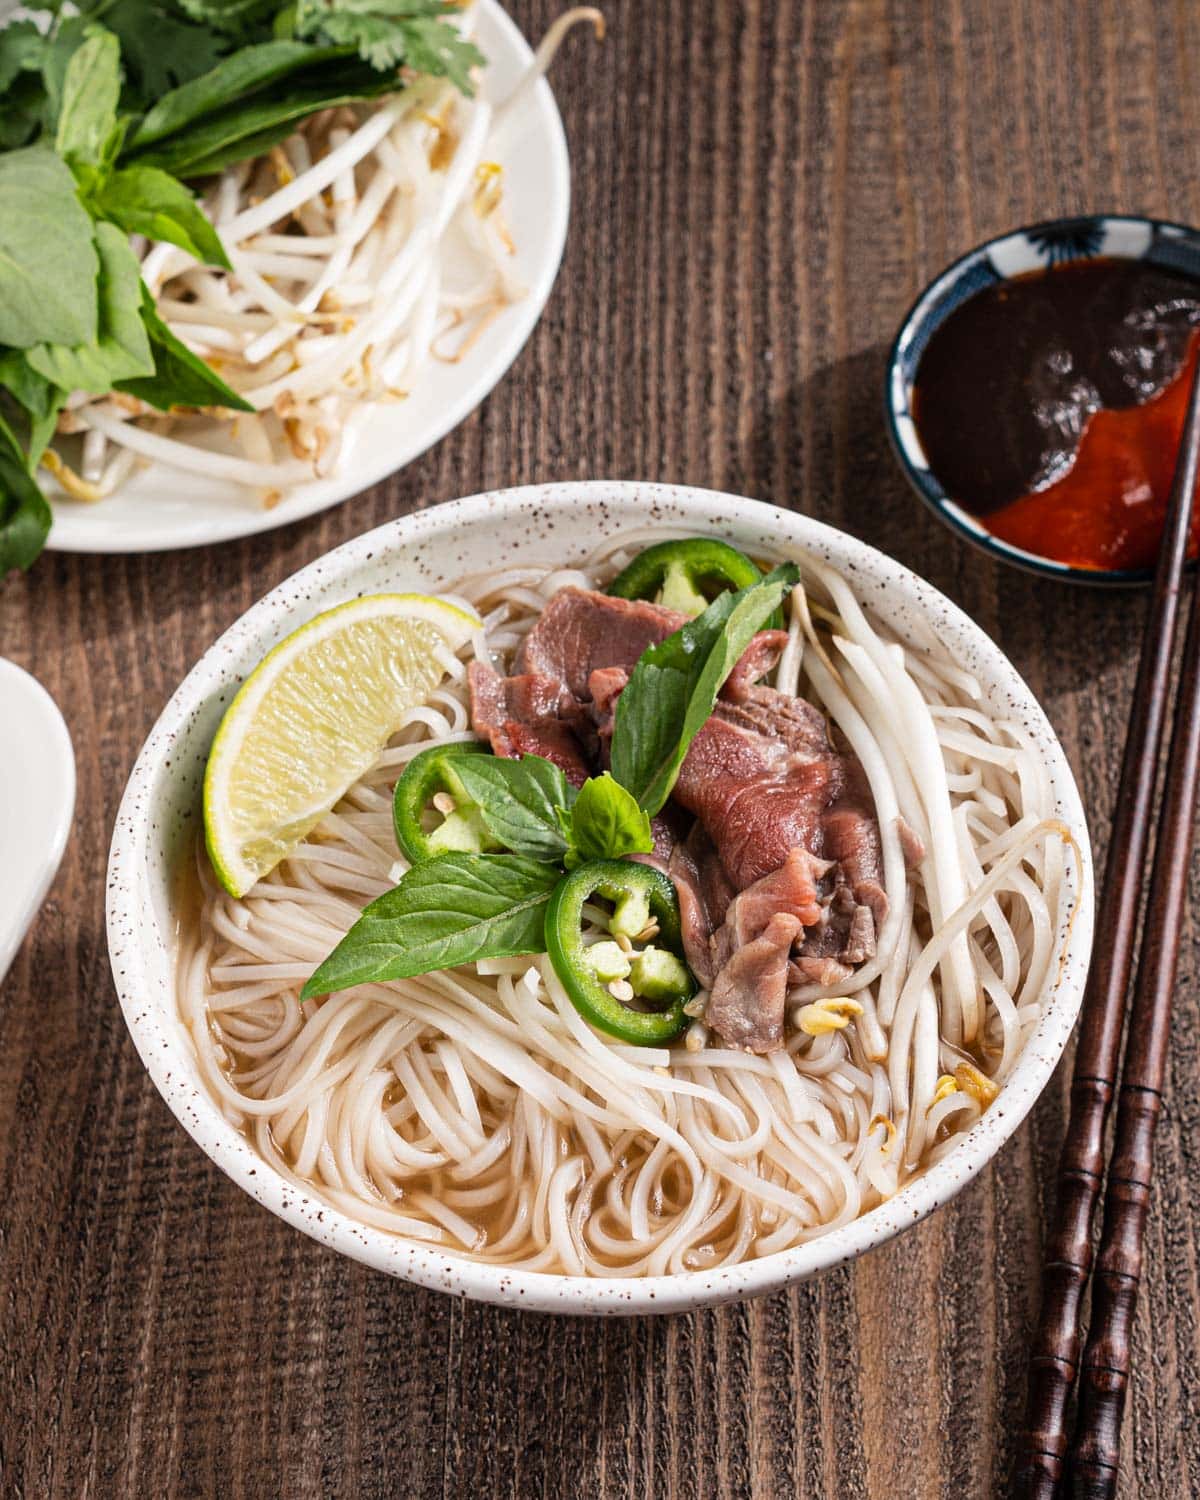
Phở Tái (Vietnamese Rare Beef Pho Soup)

When I’m craving a comforting bowl of Vietnamese noodle soup at home, pho tai is the one I make most often. The broth is clear but deeply savory, the noodles are soft and silky, and the thin slices of beef cook gently right in the bowl.
Growing up, this was the soup my mom made whenever someone wasn’t feeling well. It showed up when we were sick, tired, or just needed something warm. I’ve made this version countless times over the years, and it’s still the one I come back to.
This post walks through the full process—from toasting spices to building the broth—so you know exactly what’s going into your bowl and why each step matters.
What is Pho Tai?
Pho tai is a Vietnamese beef noodle soup made with a fragrant beef broth, flat rice noodles (banh pho), and very thin slices of raw beef that cook when hot broth is poured over them.
Compared to versions with meatballs or mixed cuts, pho tai is a little lighter and more straightforward. It lets the broth shine, which is why getting the base right is so important.
Why This Pho Tai Works
This version focuses on balance.
The broth is clean and savory without being heavy. The seasoning is subtle, not overpowering. And the beef stays tender because it’s sliced thin and cooked gently by the broth instead of boiled.
It’s also a great make-ahead meal—the broth freezes well and reheats beautifully, which makes weeknight pho completely doable.
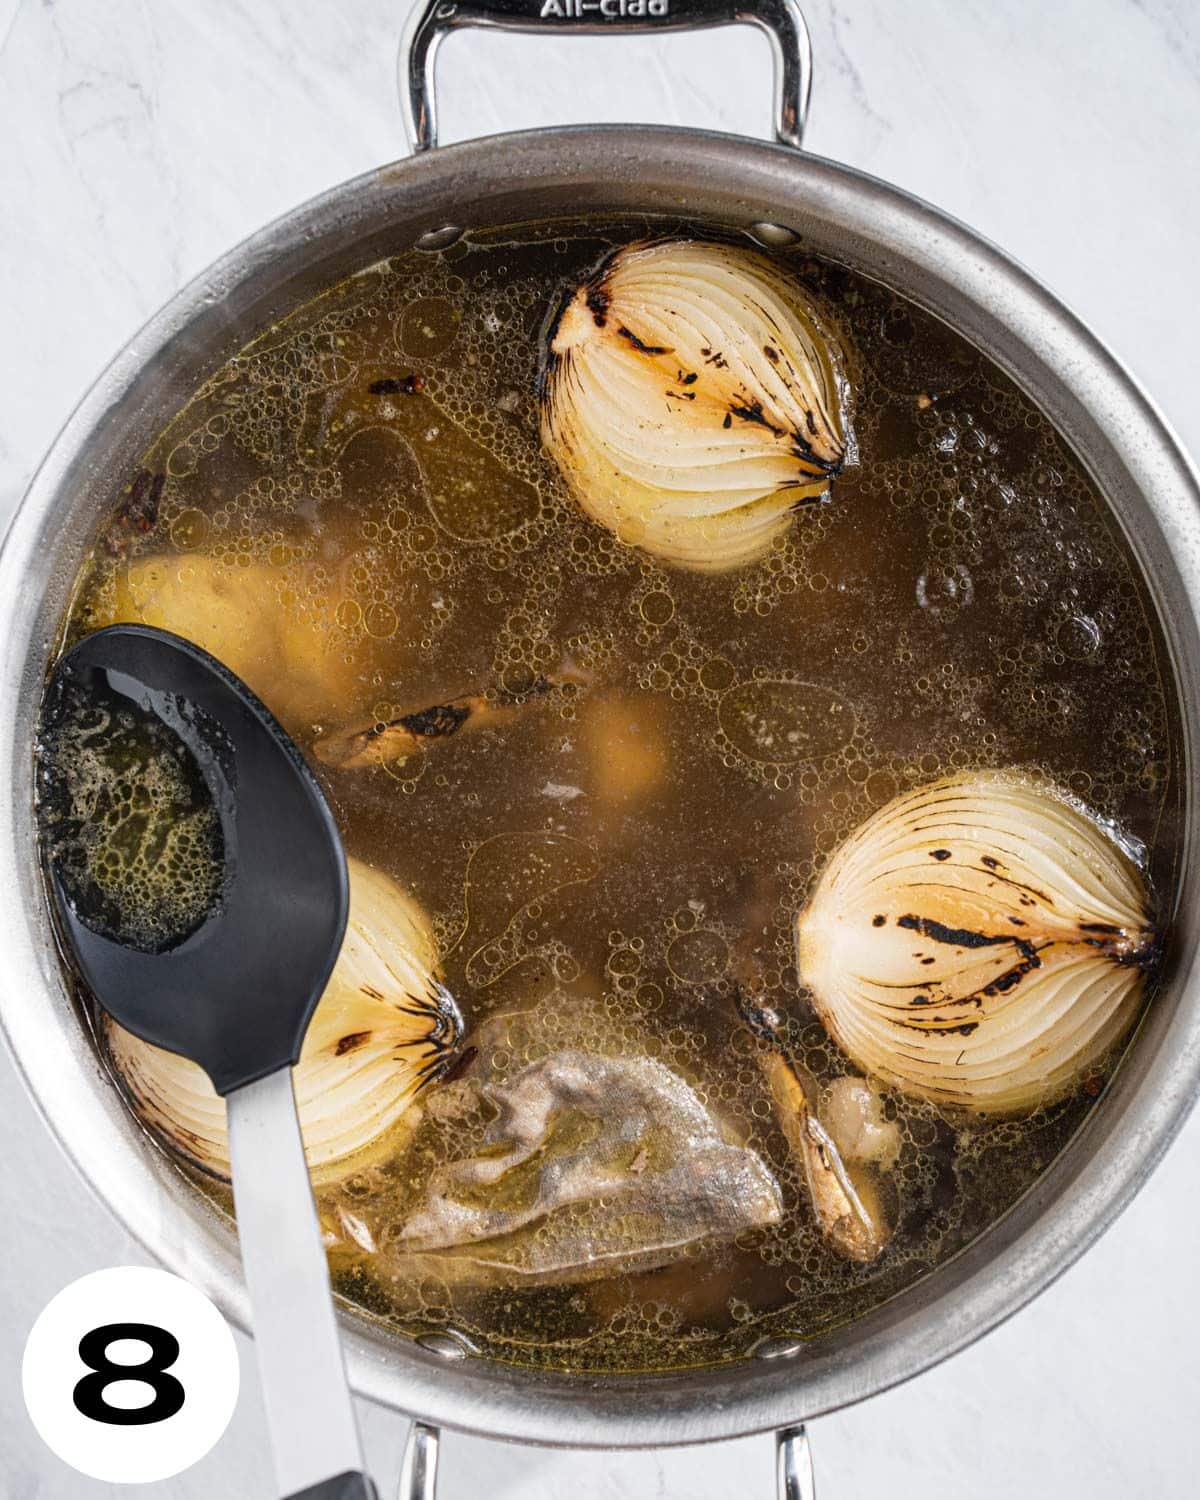
Toasting the Spices & Charring the Aromatics
These two steps are what give pho its depth.
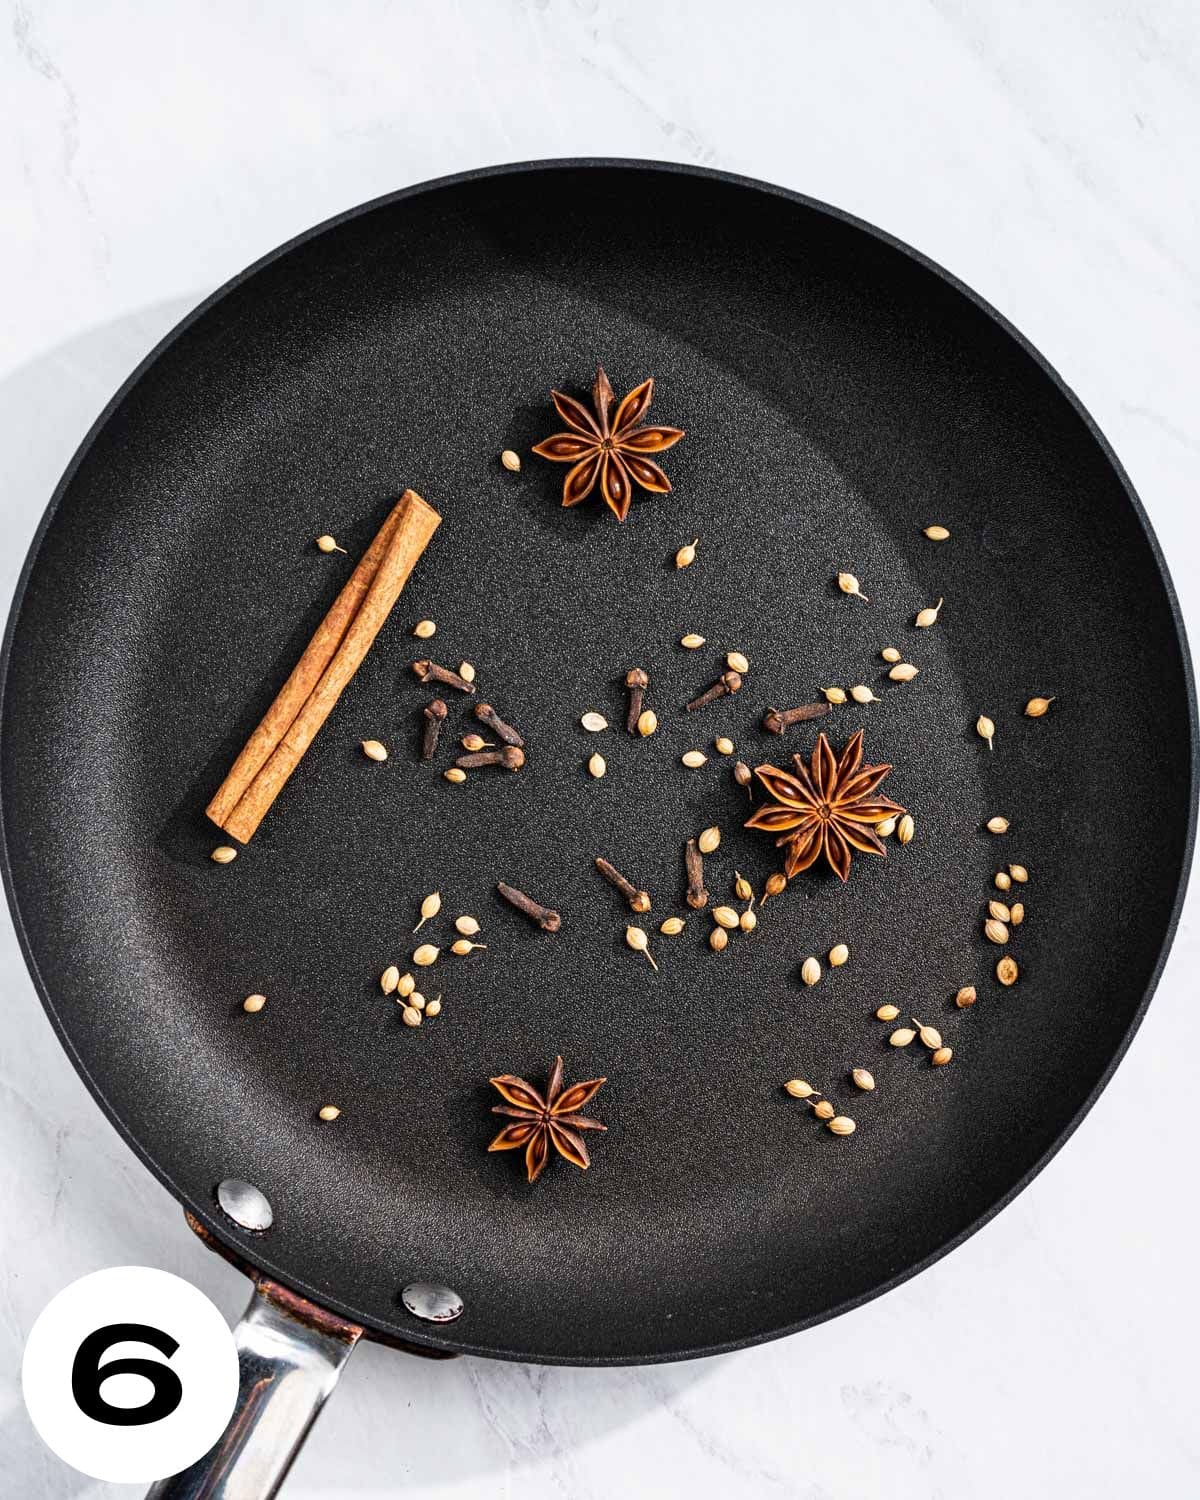
Toasting the pho spices wakes them up. Star anise, cinnamon, cloves, and coriander release much more aroma once they’re warmed in a dry pan. You don’t need to rush this—low heat and a few minutes is enough.
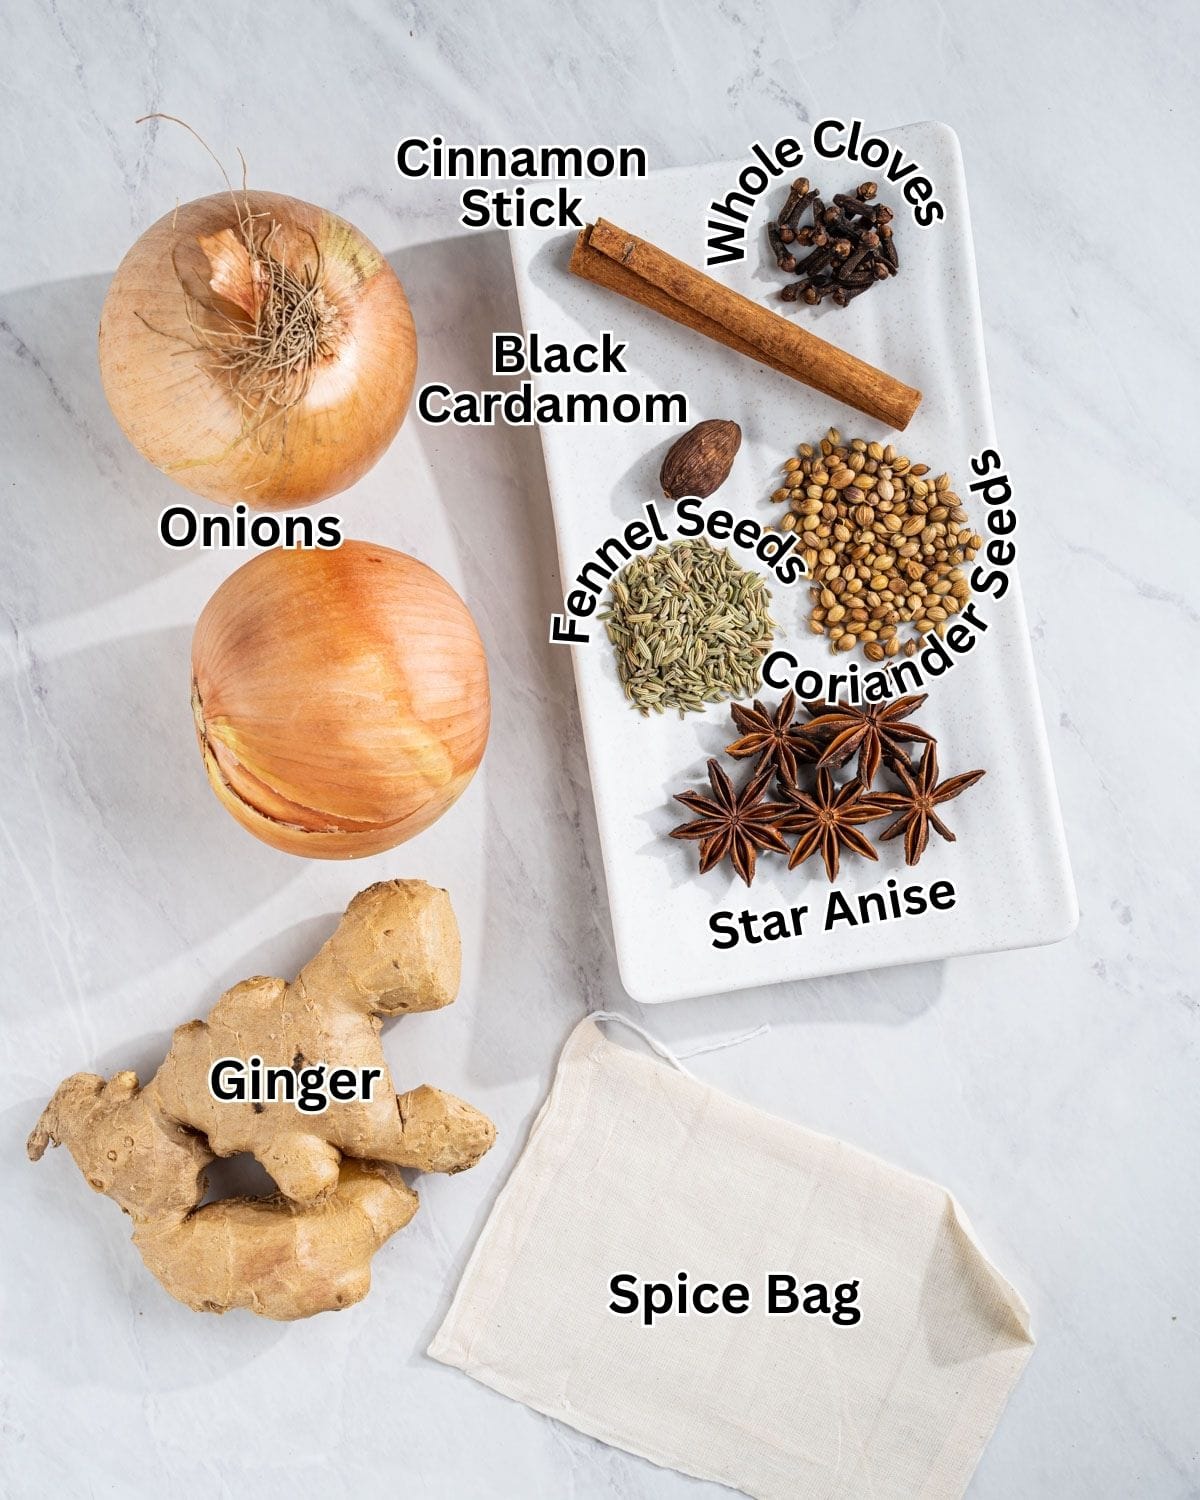
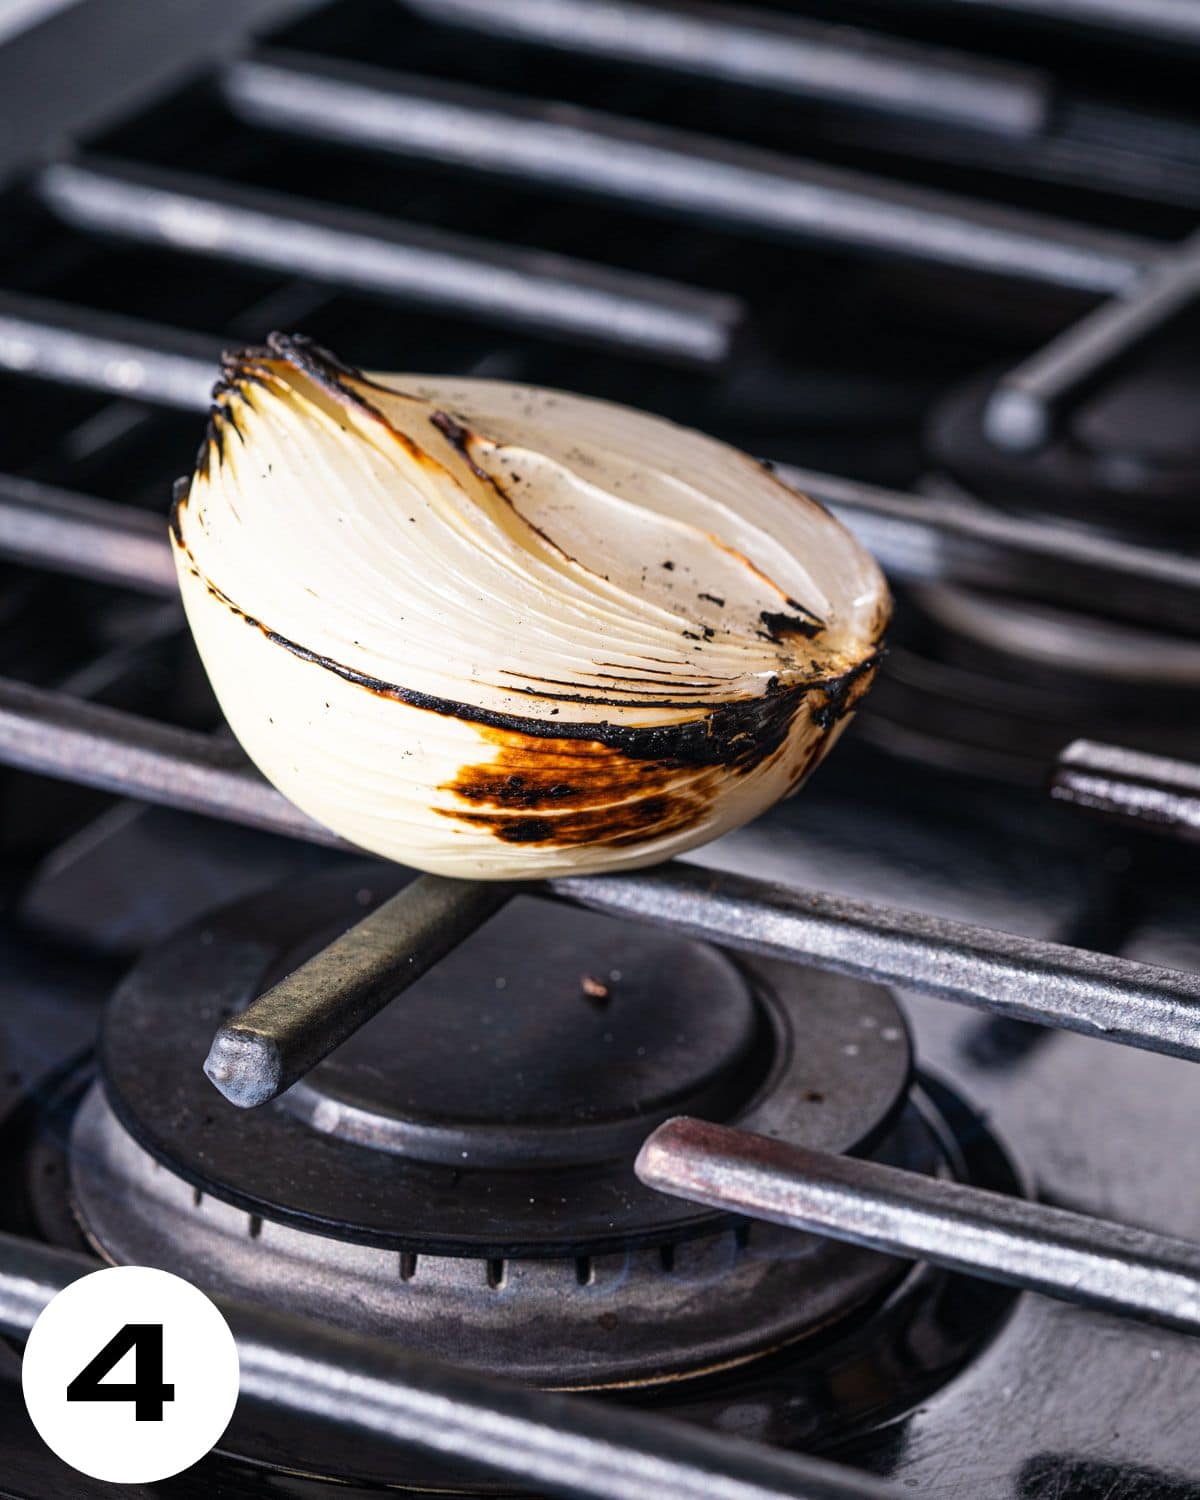
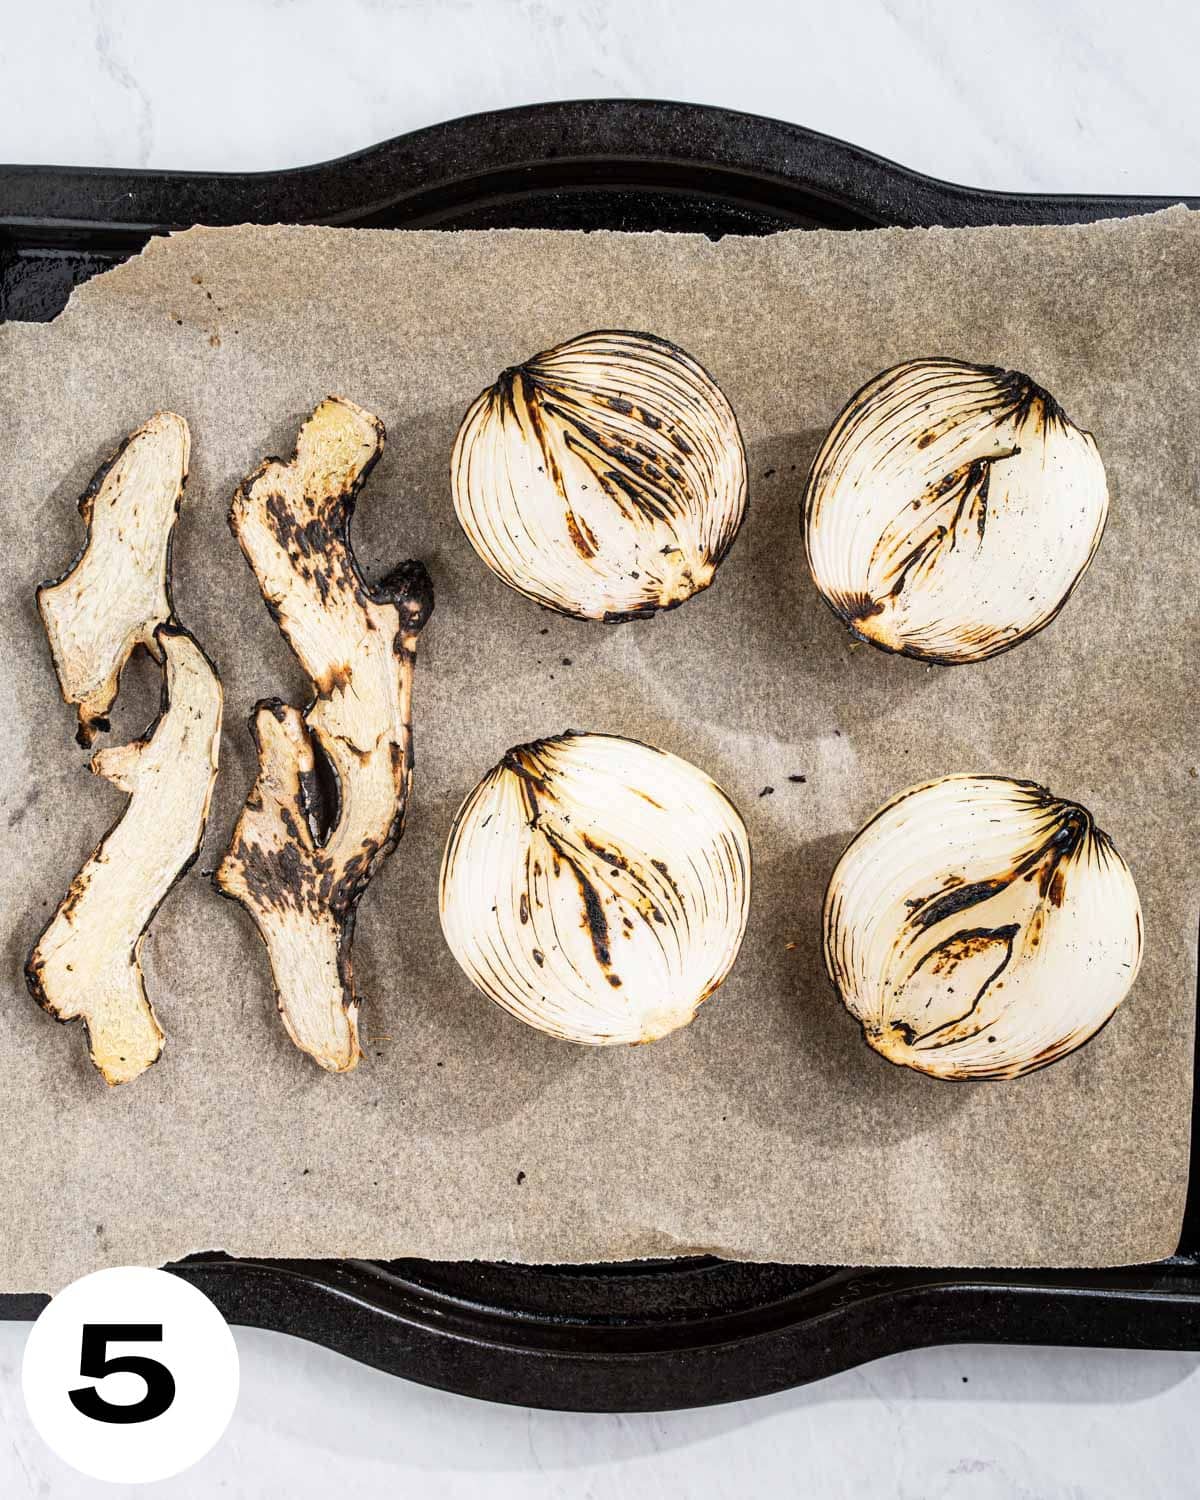
Charring the onion and ginger adds sweetness and a light smokiness to the broth. You can do this directly over a flame or under the broiler. The outside should look blistered and dark in spots—that’s where the flavor comes from.
I recommend using a spice bag or tea infuser so the spices infuse the broth without floating around. It keeps the broth clear and makes cleanup easier.
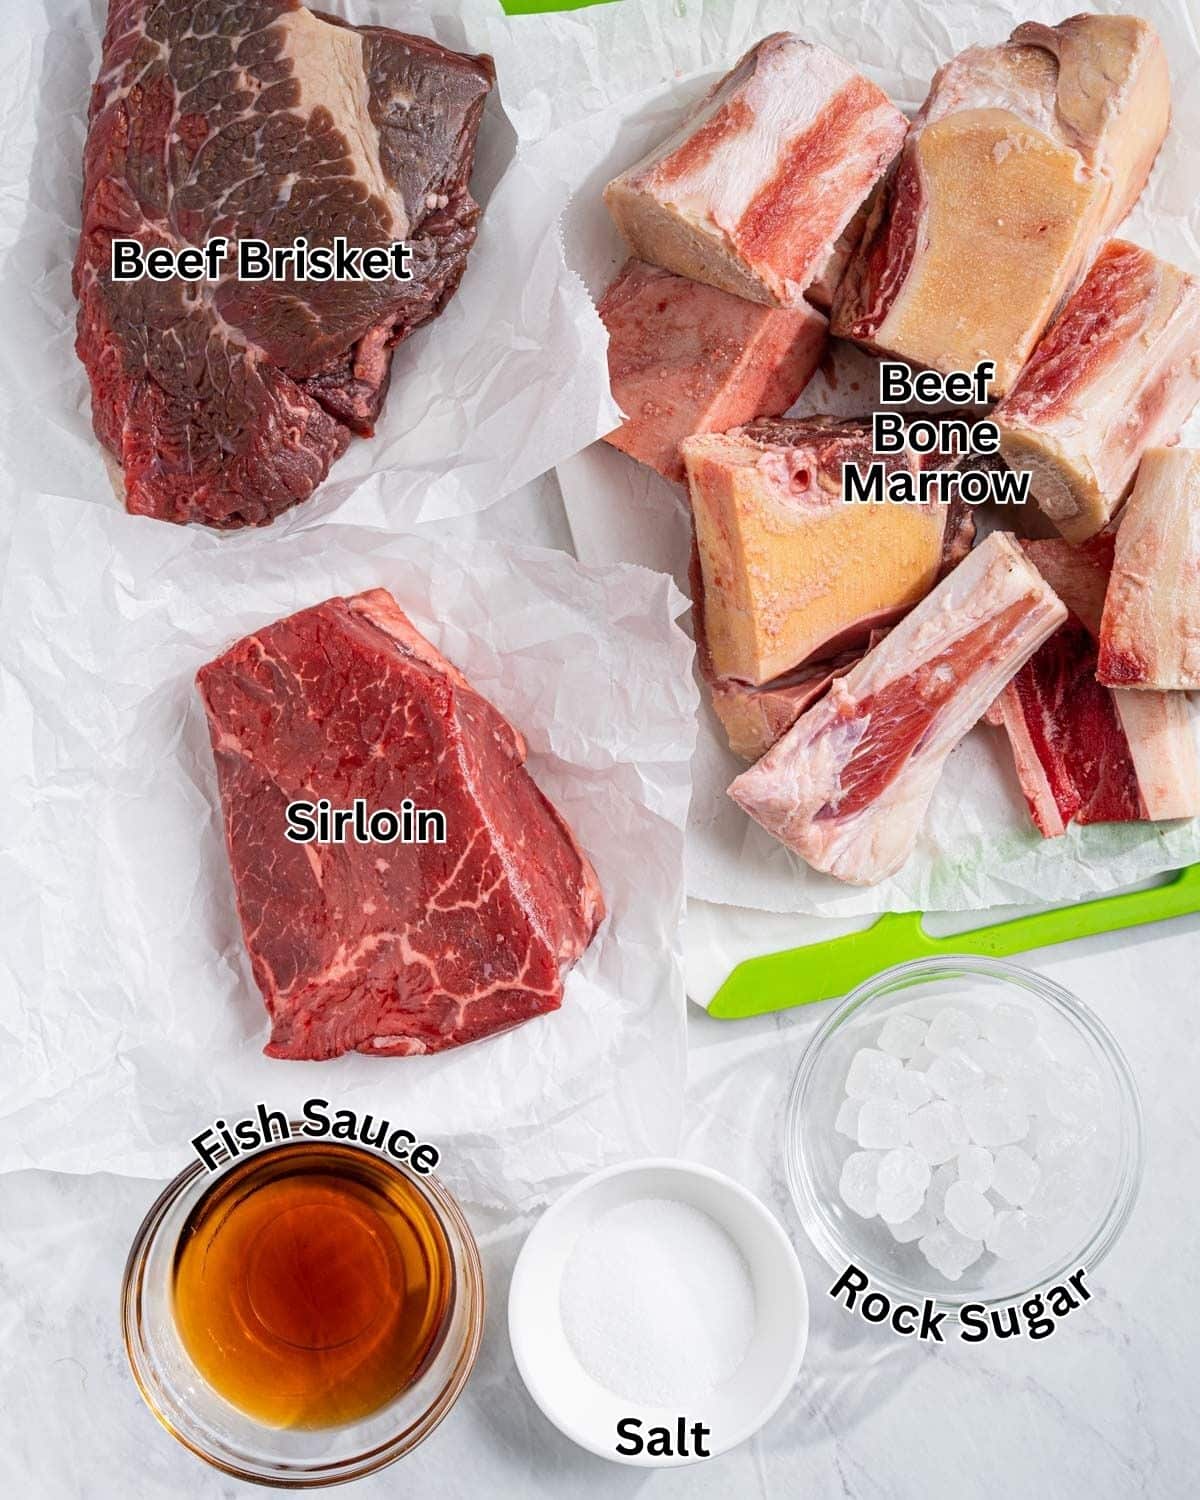
Choosing the Right Bones and Beef
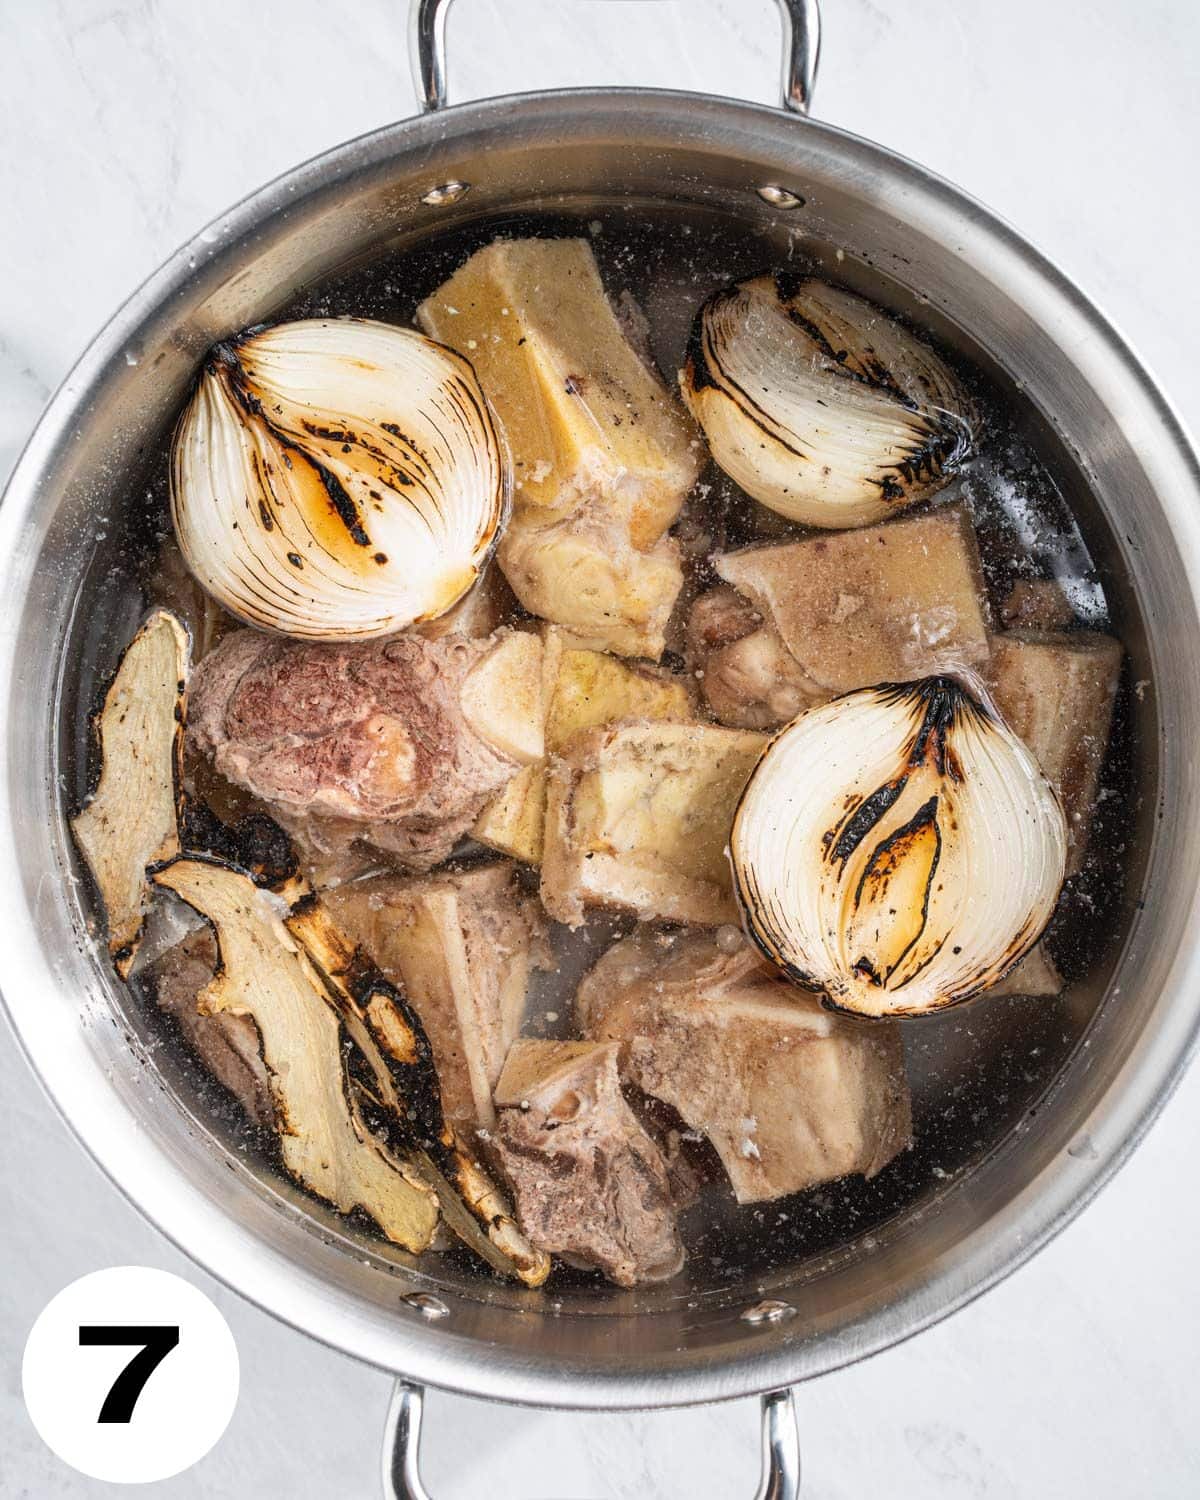
For the broth, use a mix of beef marrow or knuckle bones and brisket. The bones build structure and richness, while the brisket cooks in the broth and becomes one of your toppings.
For the rare beef (tai), sirloin or tenderloin works best. Partially freezing the meat for about 20–30 minutes makes it much easier to slice thinly.
How to Season Pho Broth
Pho broth is all about restraint.
The base seasoning comes from fish sauce, rock sugar, and salt. Fish sauce adds depth, rock sugar balances it, and salt ties everything together. Season lightly at first and adjust toward the end—broth concentrates as it simmers.
If you’re new to pho, tasting as you go helps you understand how the flavors develop.
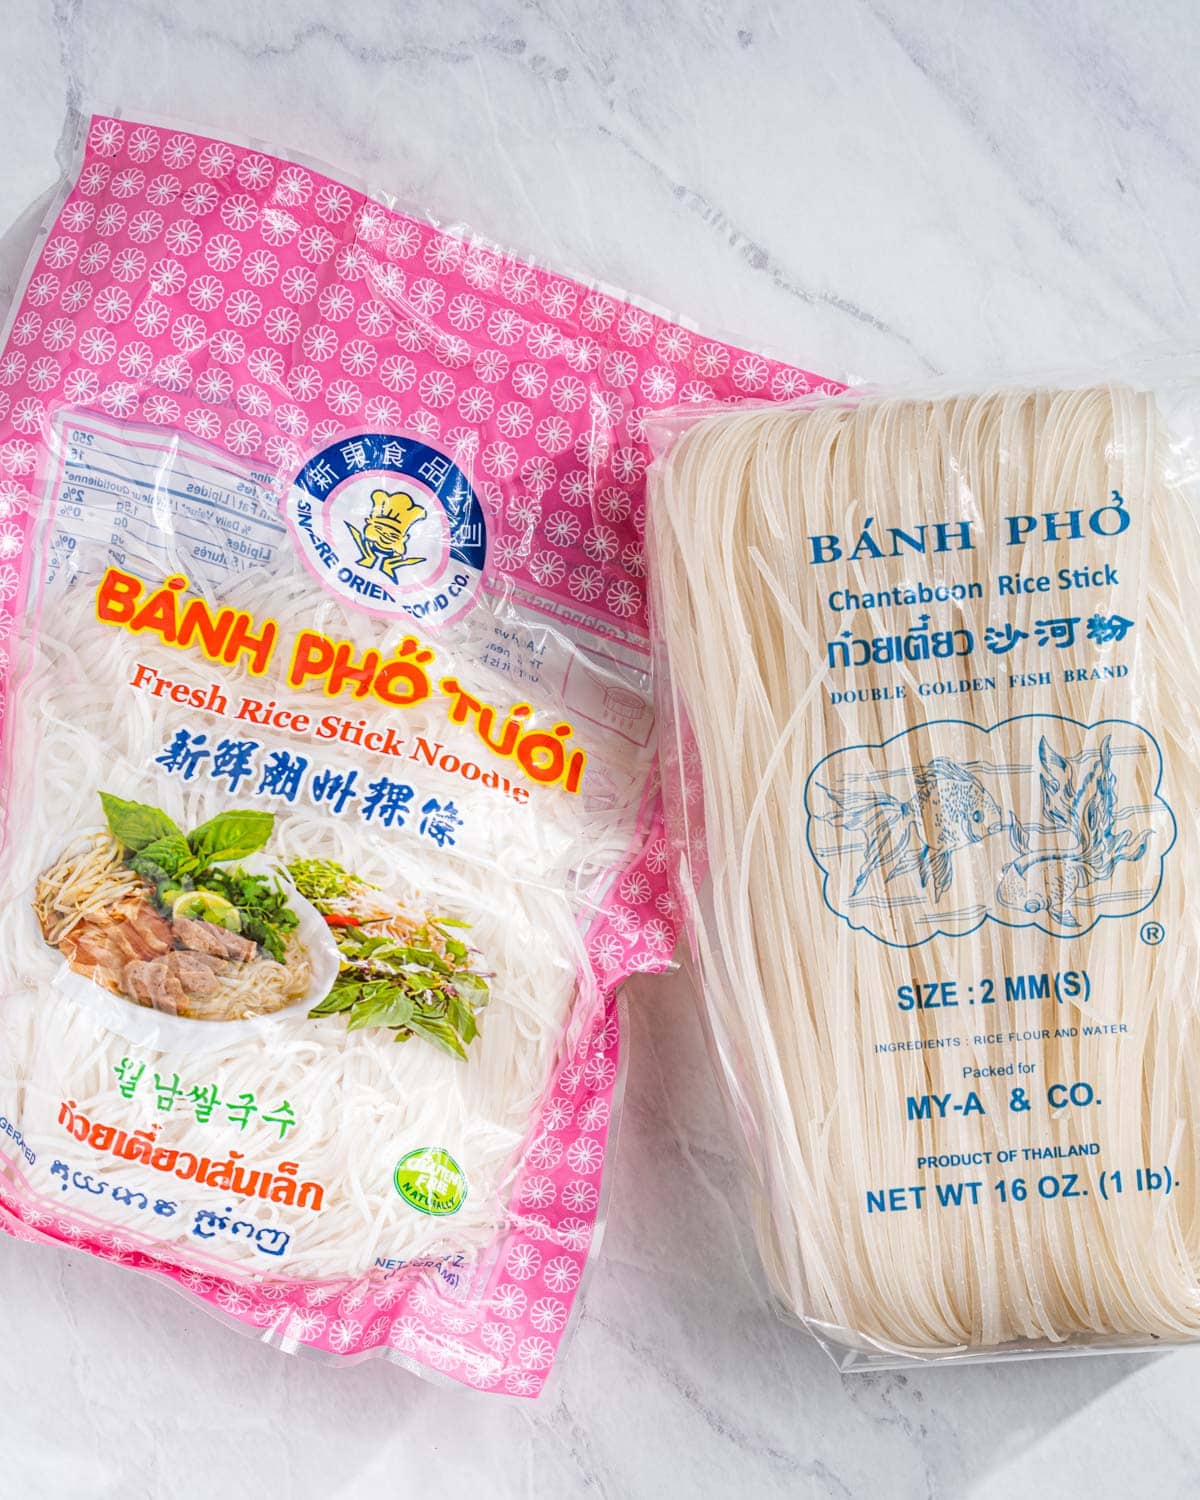
Pho Noodles: Fresh vs. Dried
Both work well—it mostly comes down to availability.
Fresh pho noodles are soft and cook quickly. A quick dip in boiling water is all they need. Dried noodles take longer, but they’re easier to store and still give great results.
If you want more detail on handling rice noodles, I have a full guide on how to cook rice noodles without overcooking them, which walks through soaking and timing by type.
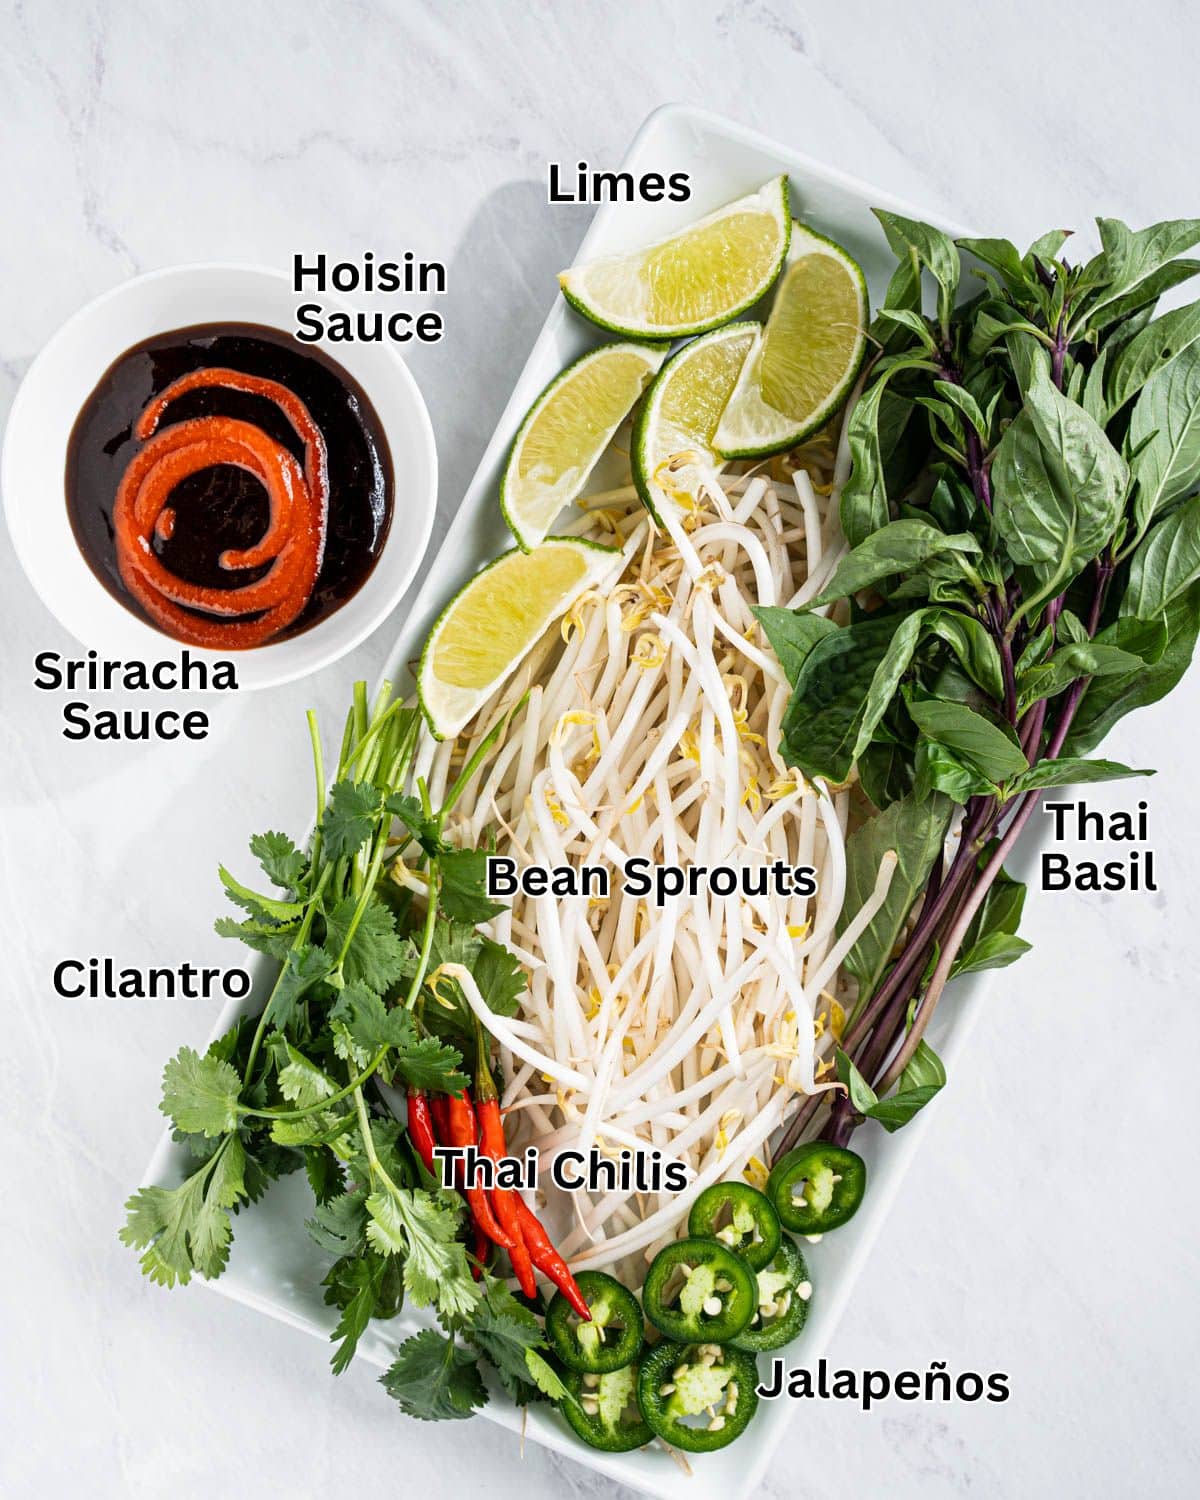
Toppings & Garnishes
This part is flexible.
I usually set out bean sprouts, Thai basil, cilantro, lime wedges, and sliced jalapenos. Hoisin and sriracha are optional and often used on the side for dipping rather than stirred into the broth.
Use what you like and skip what you don’t.
How to Make Pho Tai (Overview)
Please scroll ⬇️ to the recipe card for the full ingredient amounts and instructions.
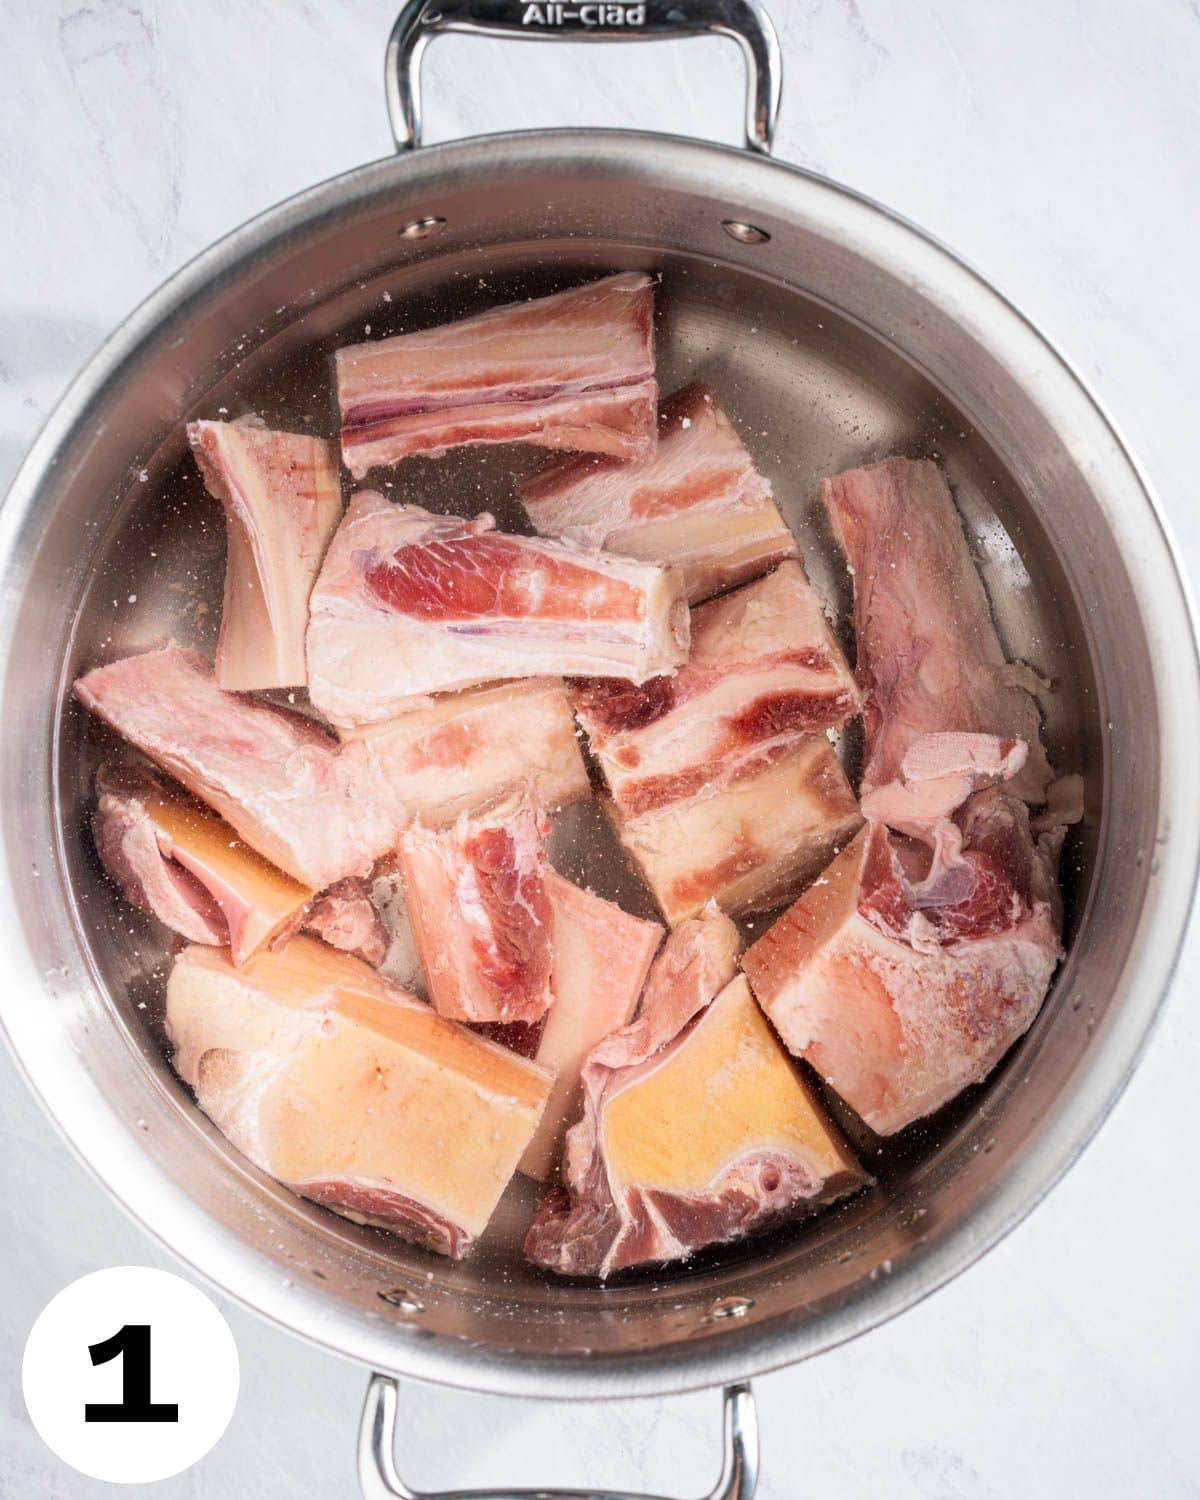
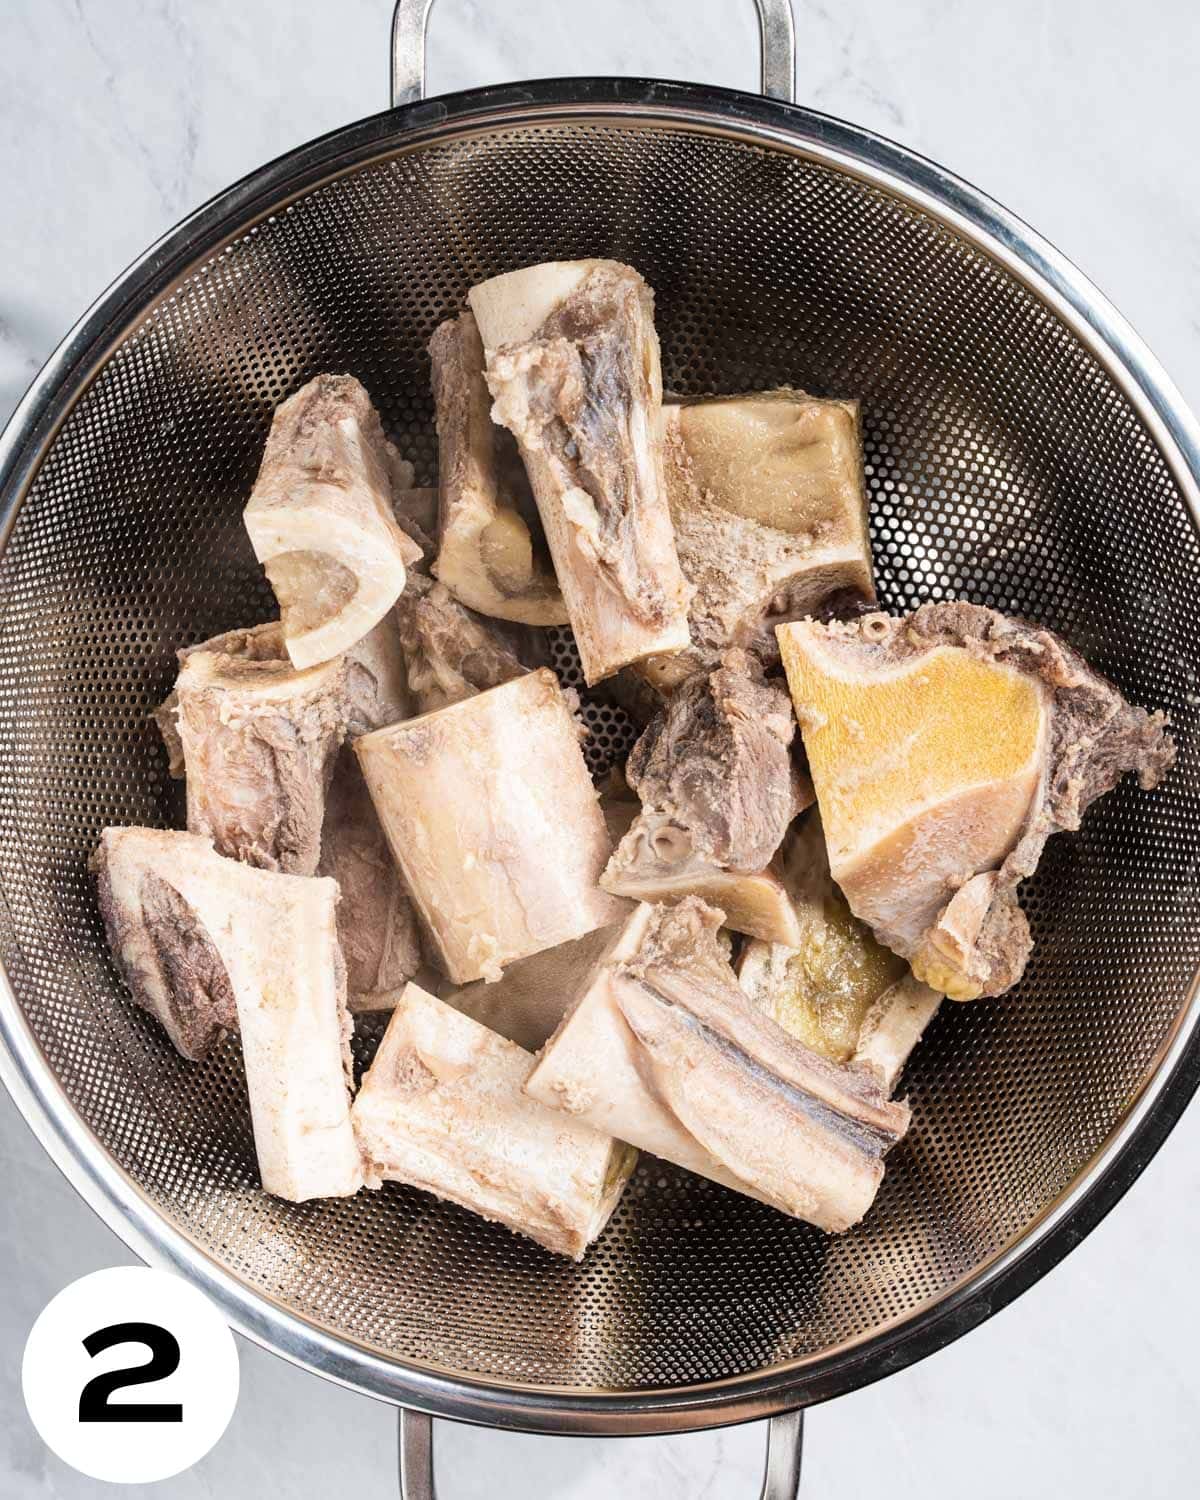
Start by parboiling the bones and brisket, then rinsing everything well. This step removes impurities and helps keep the broth clear from the start.
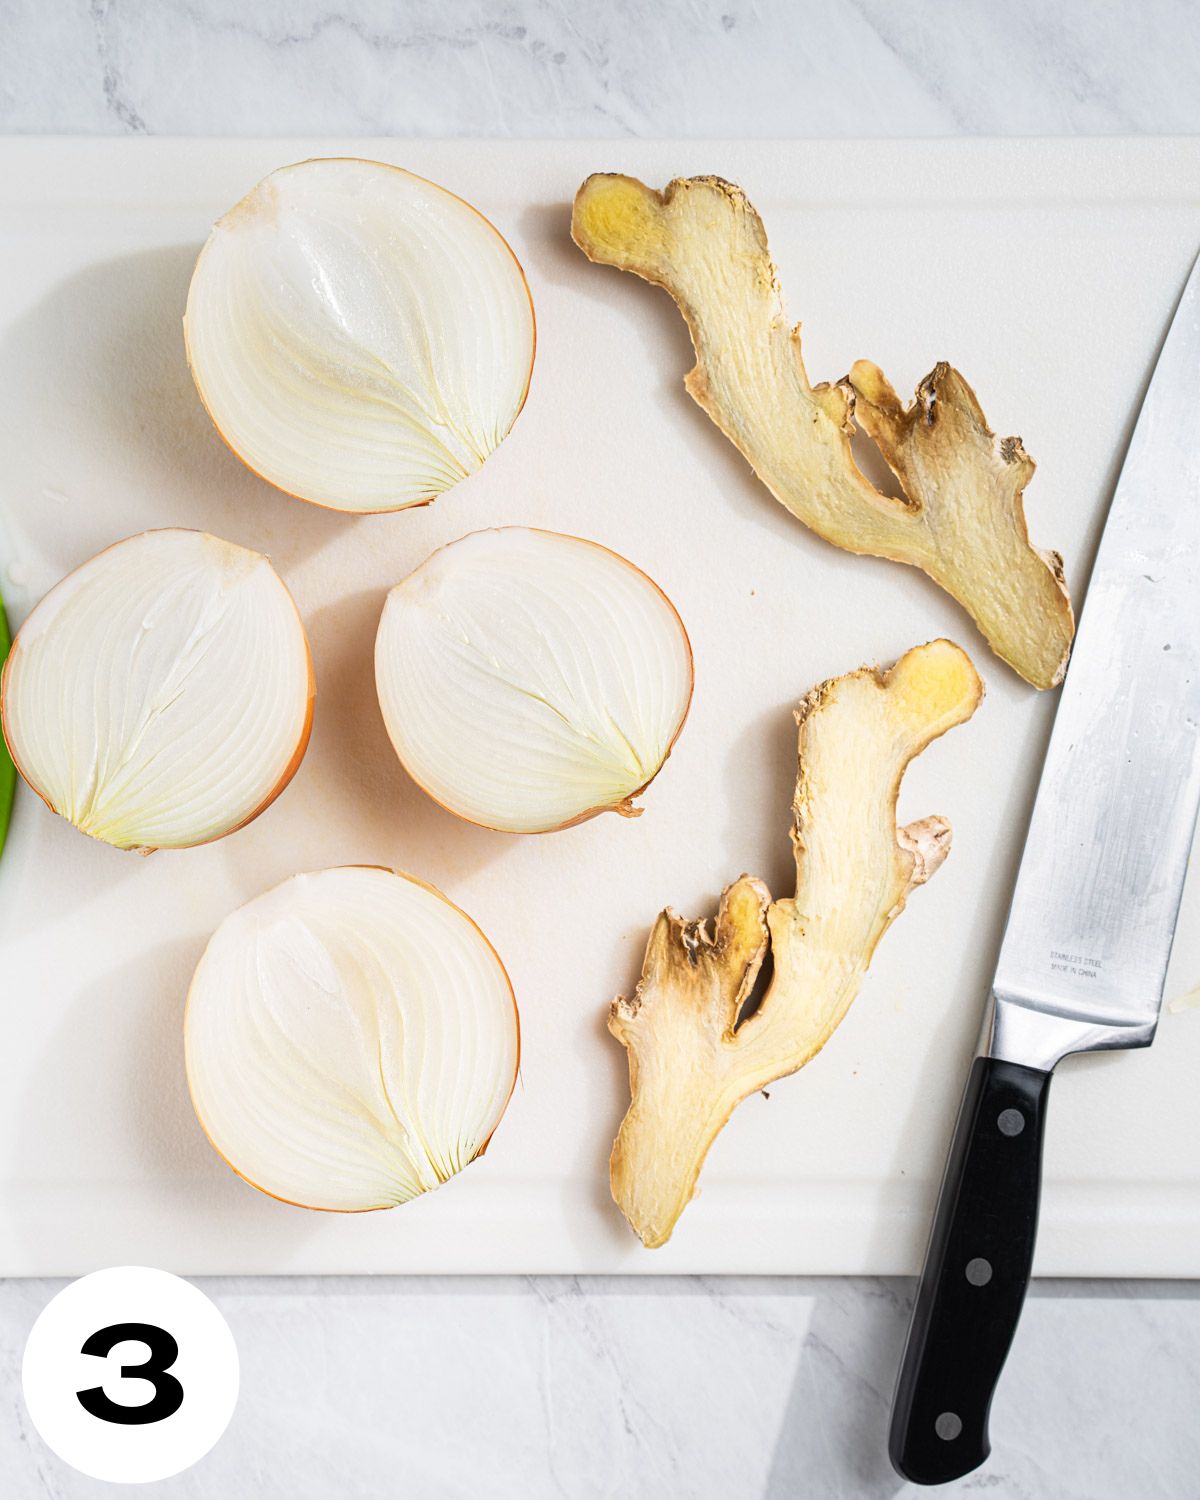
While that’s going, char the onion and ginger until blistered and fragrant. Toast the spices separately so they’re ready to go later.
Add fresh water, the cleaned bones, brisket, charred aromatics, sugar, fish sauce, and salt to a large pot. Bring it to a boil, then lower to a gentle simmer. Skim the surface regularly.
After about an hour and a half, remove the brisket and set it aside. During the last hour of simmering, add the spice bag so the broth picks up flavor without becoming overpowering.
Once the broth is done, strain out the solids for a clean, clear broth.
Cook the noodles separately, then build each bowl with noodles, sliced brisket, and raw beef. Ladle the hot broth over the beef to cook it, add garnishes, and serve right away.
(Exact measurements and timing are in the recipe card below.)
Tips for the Best Homemade Beef Pho
✔️ Use bones with marrow for a better body
✔️ Always parboil and rinse the bones
✔️ Char the aromatics until deeply fragrant
✔️ Toast spices gently to avoid bitterness
✔️ Simmer uncovered and skim often
✔️ Slice the beef very thin so it cooks instantly
Pho Tai Variations to Try
Once you’re comfortable with pho tai, there are plenty of variations using the same broth.
- Pho tai bo vien adds beef meatballs for something heartier
- Pho tai chin combines rare beef with tender brisket
- Pho tai gan includes tendon for a richer texture
- Pho tai nam uses flank steak for a slightly chewier bite
You can adjust toppings without changing the broth.
Frequently Asked Questions
You can, but the flavor won’t be the same. Homemade broth is what makes pho taste like pho.
Sirloin or tenderloin, sliced very thin.
No. The hot broth cooks the beef in the bowl. It ends up tender and lightly cooked, not raw.
Add sriracha, sliced Thai chilies, or chili garlic sauce to your bowl.
How to Serve Pho Tai
Pho tai is best served immediately while the broth is hot enough to cook the beef.
I like serving it with a plate of herbs and lime on the side. If you’re making a larger meal, add something crispy like Vietnamese egg rolls (cha gio) or a simple appetizer like Vietnamese shrimp toast to round things out.
How to Store, Reheat & Freeze
Store broth separately from noodles and toppings in the fridge for up to 4 days.
The broth freezes well for up to 3 months. Reheat gently on the stove until steaming, then assemble fresh bowls with newly cooked noodles and raw beef.
Give This Pho Tai Recipe a Try!
Pho tai isn’t difficult—it just takes time and a little patience. Once you’ve made it yourself, it’s hard to go back.
If you try this recipe, leave a comment and let me know how it turned out. And if you want to make it again later, save it on Pinterest so it’s easy to come back to.
RECIPE

Authentic Phở Tái (Vietnamese Beef Pho)
Ingredients
Aromatics
- 2 large onions, halved and peeled
- 1 large ginger root, sliced lengthwise (no need to peel)
Spices
- 5 star anise
- 2 cinnamon sticks
- 1 teaspoon whole cloves
- 1 teaspoon coriander seeds
Beef Bones
- 3 pounds beef marrow or knuckle bones
- 1 pound beef brisket
- 8 oz sirloin or tenderloin, (for serving, raw and thinly sliced)
Seasoning
- 2 tablespoons rock sugar (or granulated sugar)
- 1 tablespoon salt
- 3 tablespoons fish sauce
Noodles & Toppings (Per Bowl)
- Dried rice noodles
- Sliced brisket & raw sirloin
- Thai basil, cilantro, bean sprouts, lime wedges, jalapeño
- Hoisin sauce, sriracha (optional)
Instructions
- Parboil the Bones and Brisket. Place the beef bones in a large stockpot and cover with water. Bring to a rolling boil and cook for 5 minutes to release impurities. Add the brisket during the last minute. Drain everything and rinse the bones and brisket thoroughly under running water. Rinse and clean the pot well before continuing.
- Char the Aromatics. Char the onions and ginger over an open flame or under the broiler until blistered and blackened in spots, about 5 minutes. Rinse lightly to remove loose burnt bits and set aside.
- Toast the Spices. In a dry pan over low heat, toast the star anise, cinnamon sticks, and cloves until fragrant, about 2–3 minutes. Add the coriander seeds during the last minute so they don’t burn. Remove from heat and transfer to a spice bag or tea infuser.
- Simmer the Broth. Return the cleaned bones and brisket to the stockpot. Add 6 quarts of fresh water, charred onions and ginger, rock sugar, salt, and fish sauce. Bring to a boil, then immediately lower to a gentle simmer. Simmer uncovered, skimming foam regularly. After about 1½ hours, remove the brisket and set it aside to cool. Continue simmering the broth with the bones.
- Continue Simmering and Add Spices. Continue simmering the broth gently. During the last hour of cooking, add the toasted spices in a spice bag or tea infuser. Simmer uncovered or partially covered until the broth is clear and deeply flavorful.Total simmer time: about 3½ to 4 hours.
- Strain and Season. Remove and discard the bones, aromatics, and spice bag. Strain the broth through a fine-mesh strainer for clarity.Taste and adjust seasoning with additional salt or fish sauce if needed.
- Prepare Noodles and Beef. Cook rice noodles according to package instructions.Fresh noodles: blanch for 15–30 secondsDried noodles: boil for 8–12 minutesRinse with cold water and drain well.Thinly slice the cooled brisket. Slice the raw sirloin or tenderloin paper-thin against the grain (partially freezing helps).
- Assemble and Serve. Divide noodles between bowls. Top with sliced brisket and raw beef. Ladle piping-hot broth over the beef to cook it. Add herbs and toppings as desired and serve immediately.
Notes
- Use marrow or knuckle bones with a little meat attached—they give the broth a richer flavor and body.
- Parboil the bones first to remove impurities and keep your broth clear.
- Char the onion and ginger until blistered—don’t skip this step! It adds depth and sweetness.
- Toast your spices right before adding them to release the oils and aromas.
- Simmer low and slow with the lid partially off and skim often to avoid a cloudy broth.
- Slice beef super thin. Partially freezing it makes this way easier.
- Cook noodles separately and rinse with cold water to prevent clumping.
- Ladle broth directly over raw beef—the heat will cook it to tender perfection in seconds.


Instead of parboiling, I roast the bones at 425F for 30 minutes, then rinse them in cold water. That removes all the scum, plus roasting the bones makes the broth taste richer.
This is delicious and so easy to follow! My family loved this recipe!
This is the best pho recipe I have made in a long time.
I made double the recipe to have some of the broth on standby for when I am craving pho for lunch and dinner.
I’ve always been intimidated by making pho until I found this recipe! It’s so easy to follow and best of all my kids loved it. I plan on doing this frequently!
Thank you so much for this recipe. It’s so delicious. I have always wanted to know how to make this Pho. We had seconds!
Thank you so much for this comprehensive recipe. I’ve been really into making ramen, pho, and hot pot recipes from home lately but they can get super complicated. The way you’ve written this recipe is super helpful and easy to follow!
Thank you for the tips and tricks. I would have never thought about putting the coriander last when toasting.
Oh, I love Pho! The broth was rich, fragrant, and comforting, everyone loved it! Thank you for sharing!
Oh, wow. This looks so good. I love that you included some helpful tips on making it. I’ve never made anything like this before so that’s a big help.