Chicken Katsu


Chicken katsu is one of those recipes that feels like comfort food with a crispy upgrade. It’s all about juicy chicken cutlets coated in a shatteringly crisp panko crust—pan-fried until golden and served with sweet-savory tonkatsu sauce. Whether you’ve had it in a bento box or at your favorite Japanese spot, making it at home is surprisingly easy and so worth it.
I make this when I want something crowd-pleasing, simple, and craveable. It’s easy enough for a weeknight, but still feels special. The crunch of the coating, the tender chicken, and that drizzle of sauce? Just add rice and a side of cabbage, and dinner’s done.
What is Chicken Katsu?
Chicken katsu is a Japanese-style breaded and fried chicken cutlet—basically, Japan’s version of a schnitzel. The name “katsu” comes from the word katsuretsu, meaning cutlet. It’s typically made with panko breadcrumbs, which gives it that signature crunchy texture. You’ll find it served with shredded cabbage and tonkatsu sauce, often over rice or tucked into a sandwich (katsu sando!).
Why You’ll Love This Chicken Katsu
- Crispy outside, juicy inside – Pounding the chicken keeps it super tender, and panko brings the crunch.
- Simple ingredients – You probably already have most of this on hand.
- Kid- and adult-approved – A total crowd-pleaser.
- Make-ahead friendly – Bread it in advance and fry when you’re ready.
- Pairs with anything – Rice, salad, noodles, sandwiches—you name it.
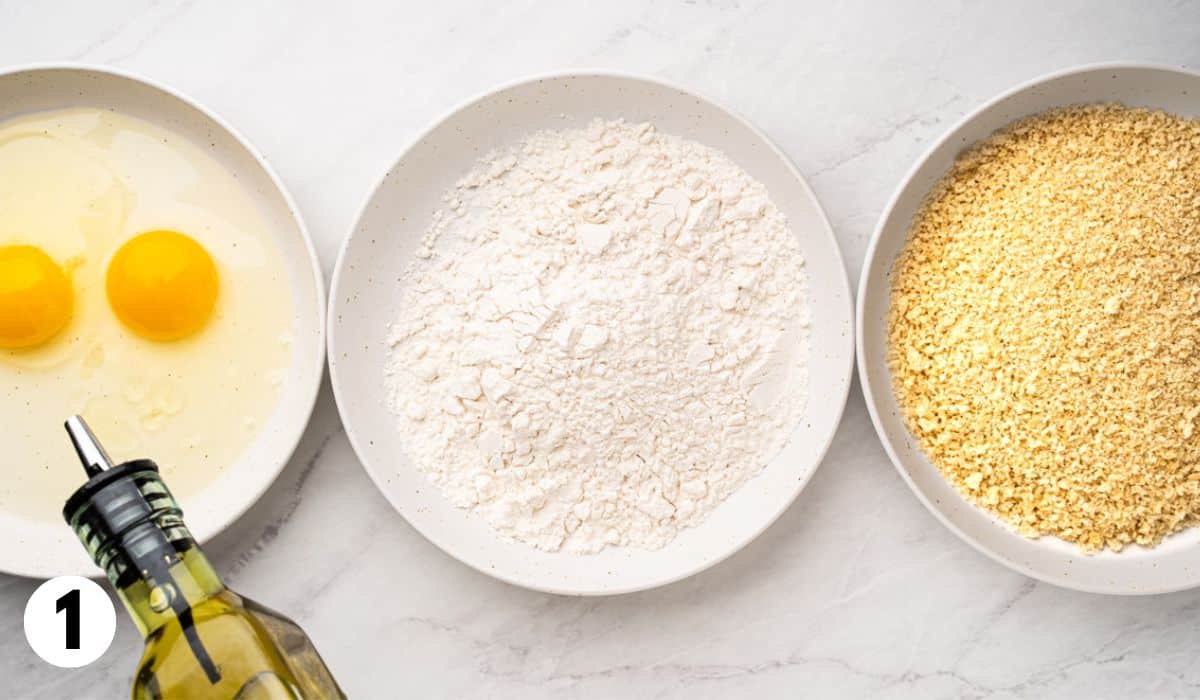
What You’ll Need
Please scroll ⬇️ to the recipe card for the full ingredient amounts and instructions.
Here’s what goes into making chicken katsu:
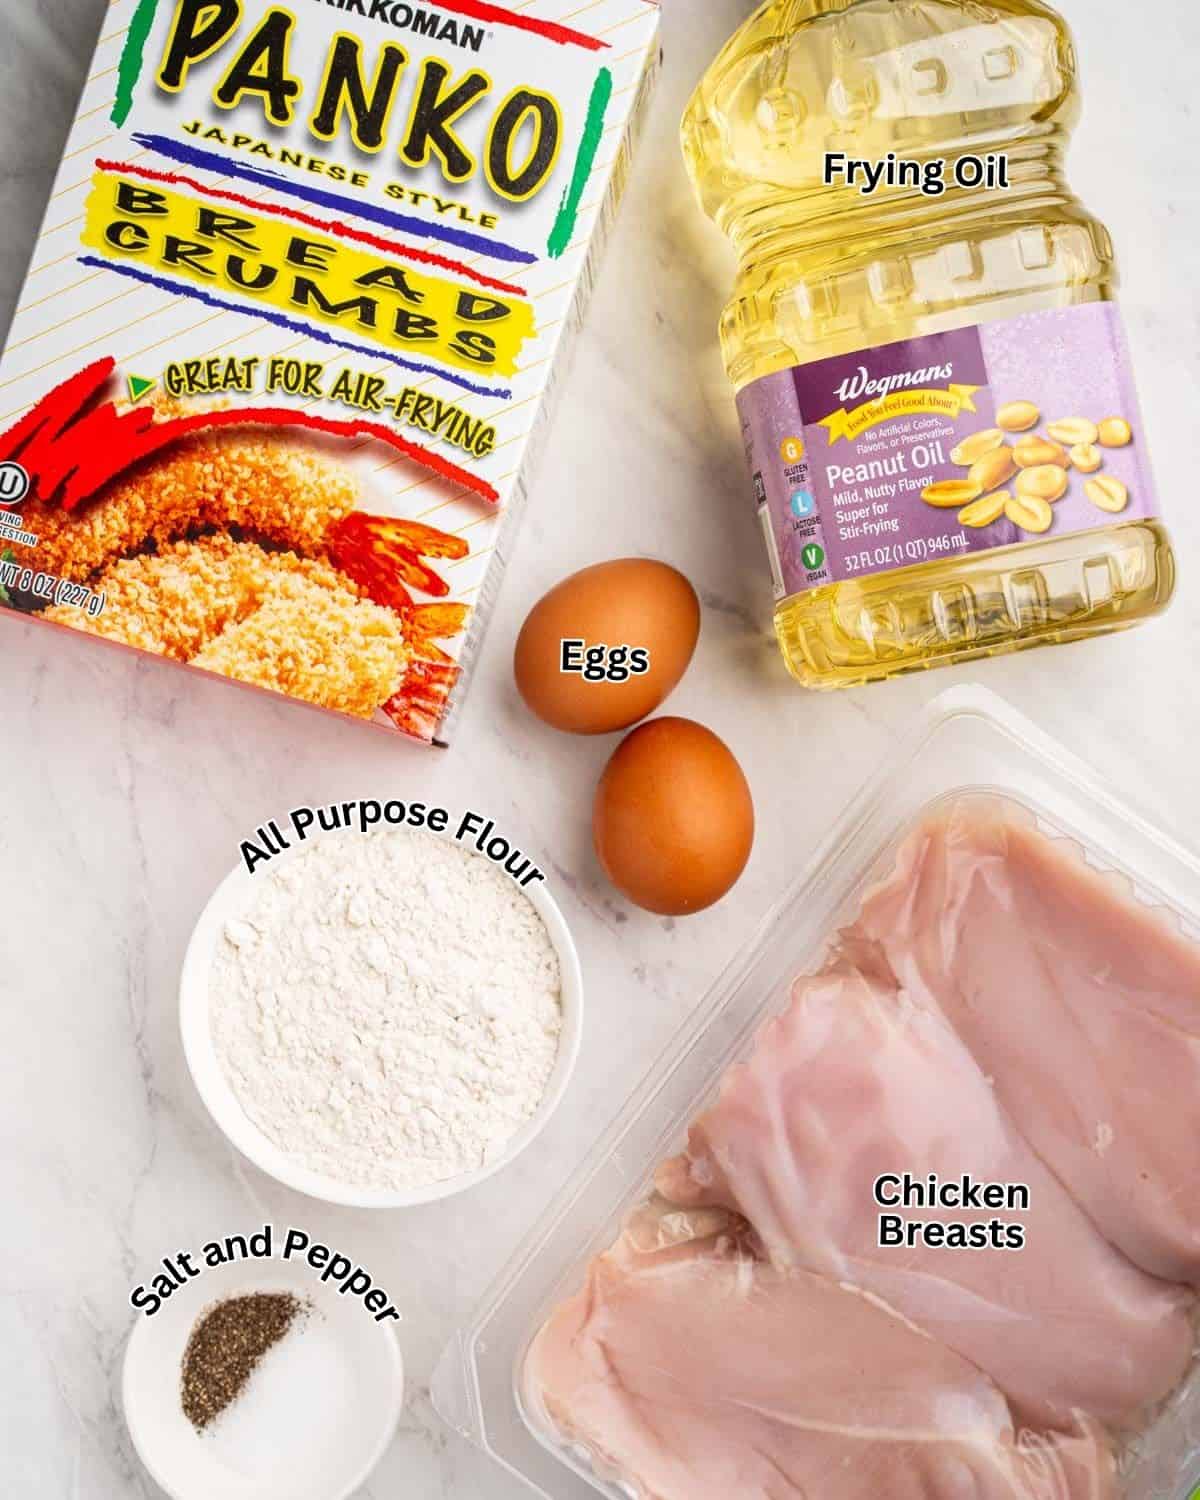
- Chicken breasts – Boneless, skinless, and sliced in half for thinner cutlets.
- Salt & pepper – Don’t skip the seasoning!
- All-purpose flour – Helps the egg stick to the chicken.
- Eggs + a little oil – The oil in the eggs helps the panko cling better.
- Panko breadcrumbs – Japanese-style breadcrumbs = extra crunch.
- Neutral oil for frying – Vegetable, canola, or peanut oil all work.
To serve:
- Tonkatsu sauce – Grab a bottle (the most popular is the Bulldog Brand Tonkatsu Sauce) or make your own in minutes (recipe below).
- Shredded green cabbage – Serve this with a squeeze of lemon or some Japanese sesame dressing.
- Steamed rice – The perfect base.
Let’s Make Chicken Katsu! (Step-by-Step)
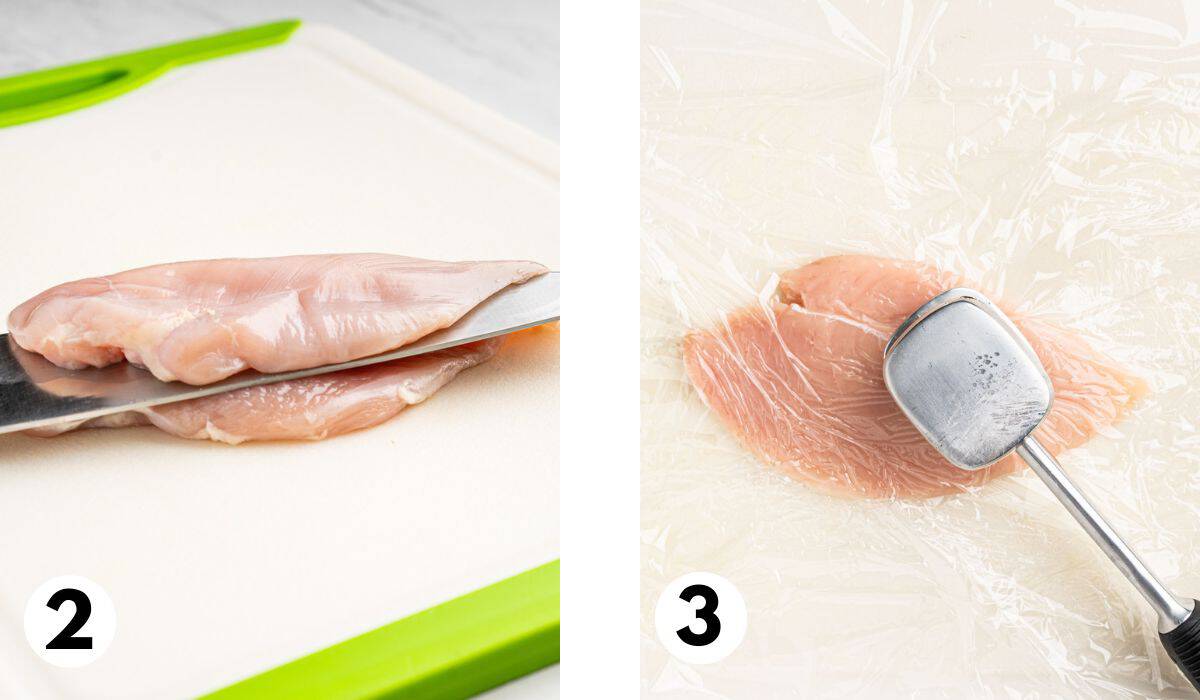
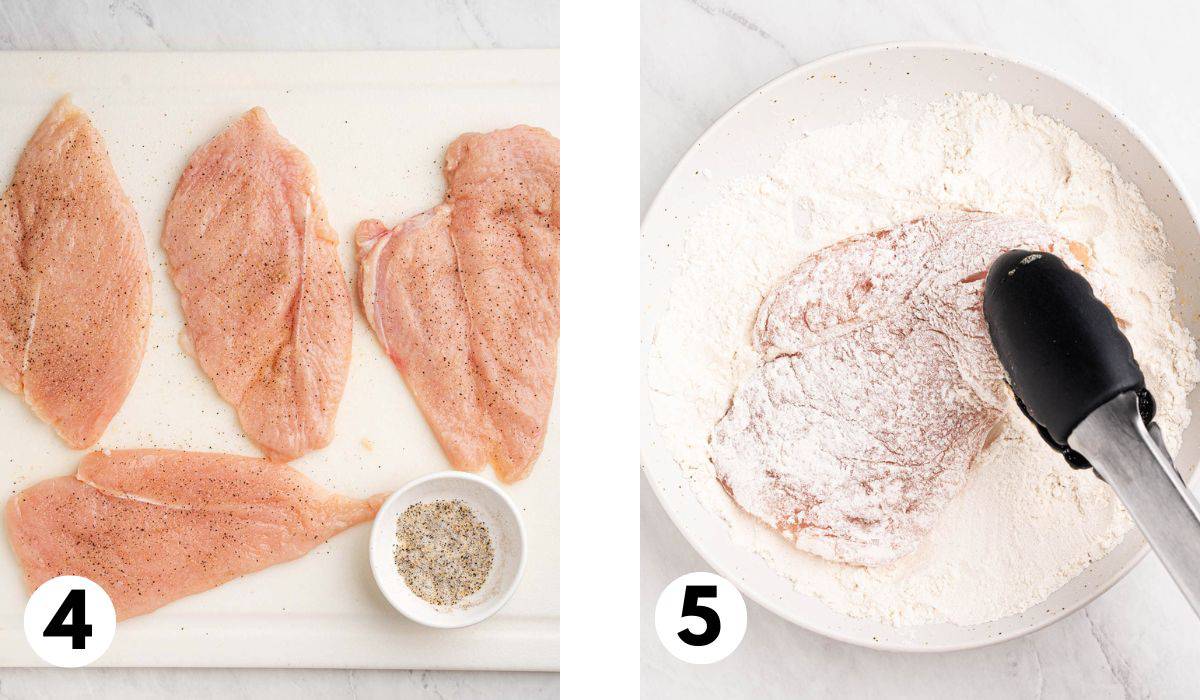
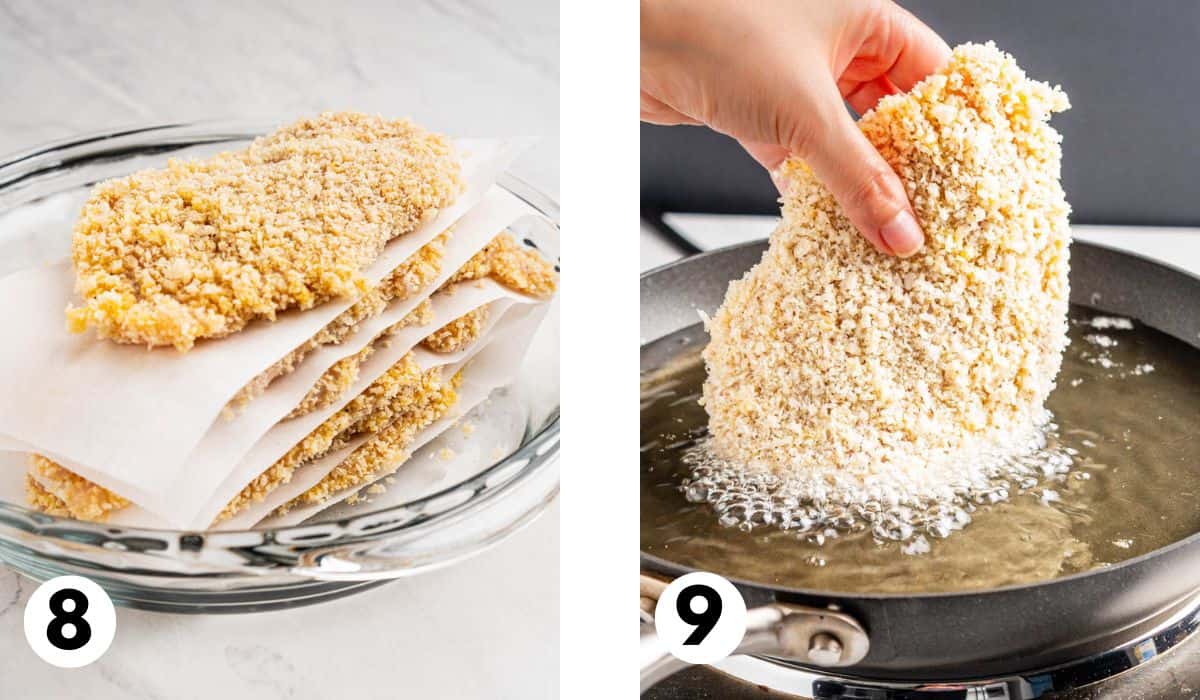
- Prep the chicken – Slice each breast in half horizontally and pound to ¼-inch thick. Season both sides with salt and pepper.
- Set up your breading station – Flour in one bowl, eggs + a bit of oil in another, panko in the third.
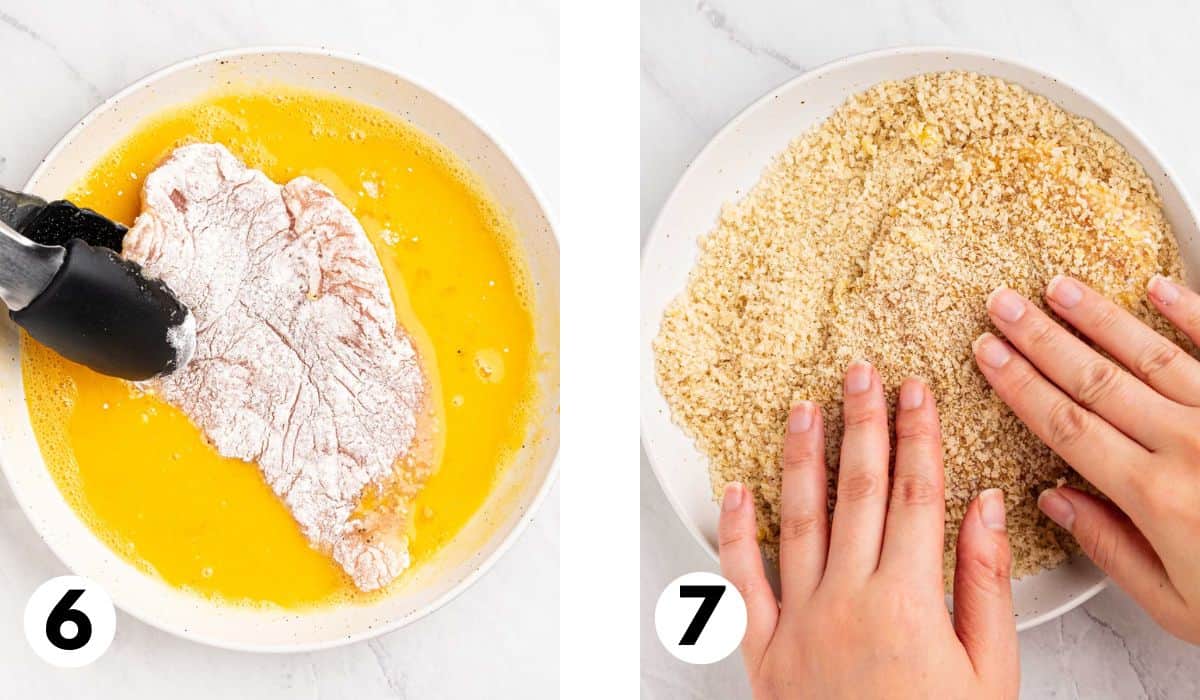
- Bread the chicken – Dredge in flour, dip in egg, and press firmly into panko until fully coated.
- Fry until golden – Heat oil in a skillet over medium-high. Once hot, cook cutlets for 3–4 minutes per side until golden brown and cooked through.
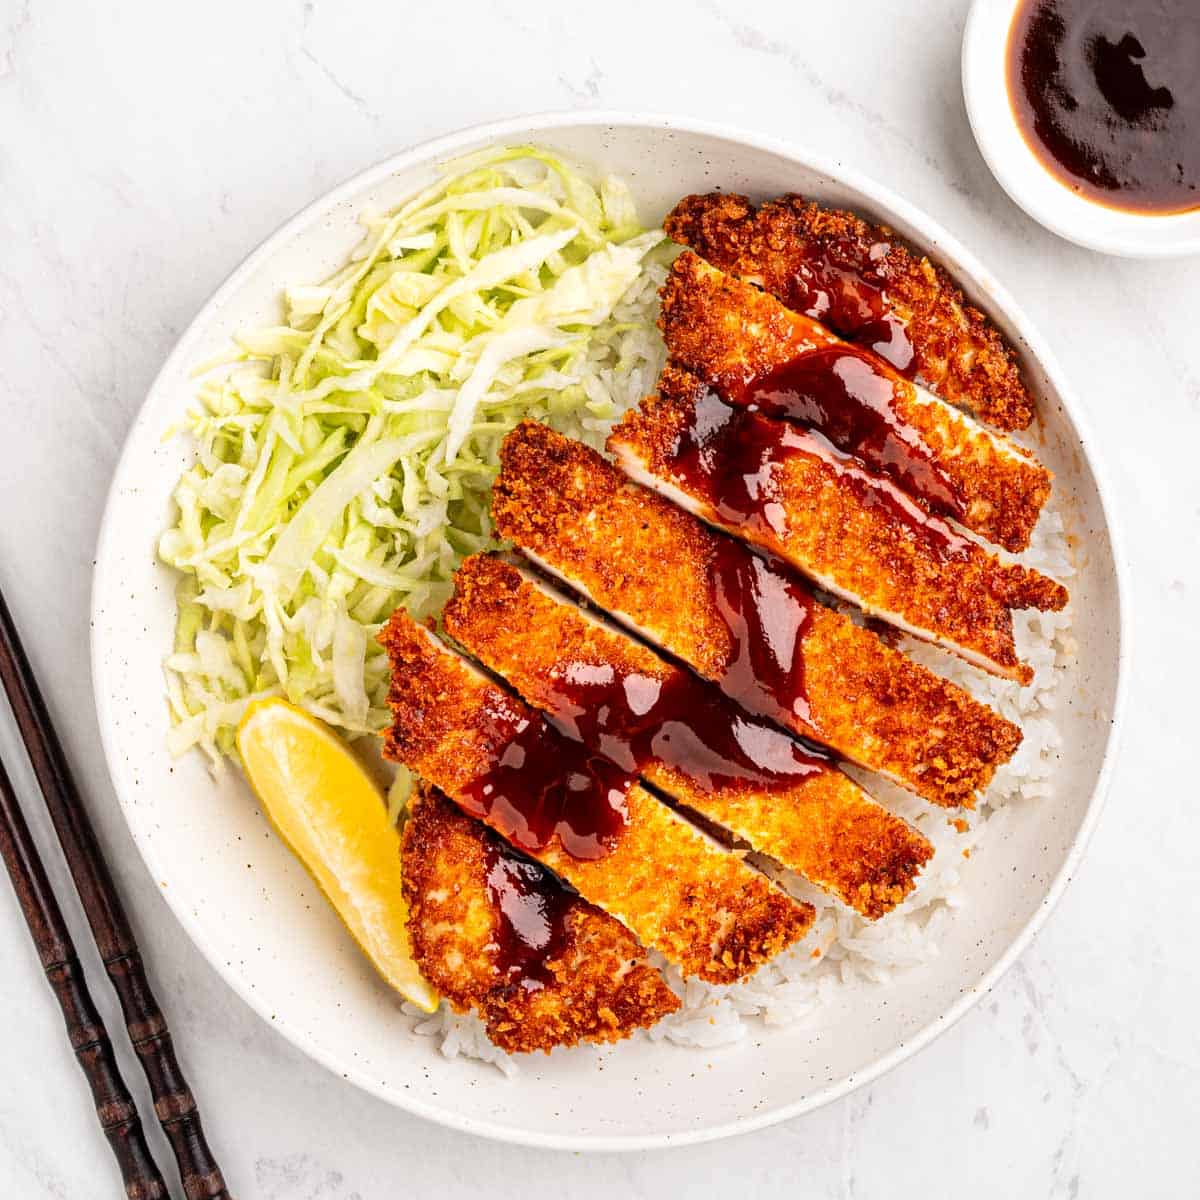
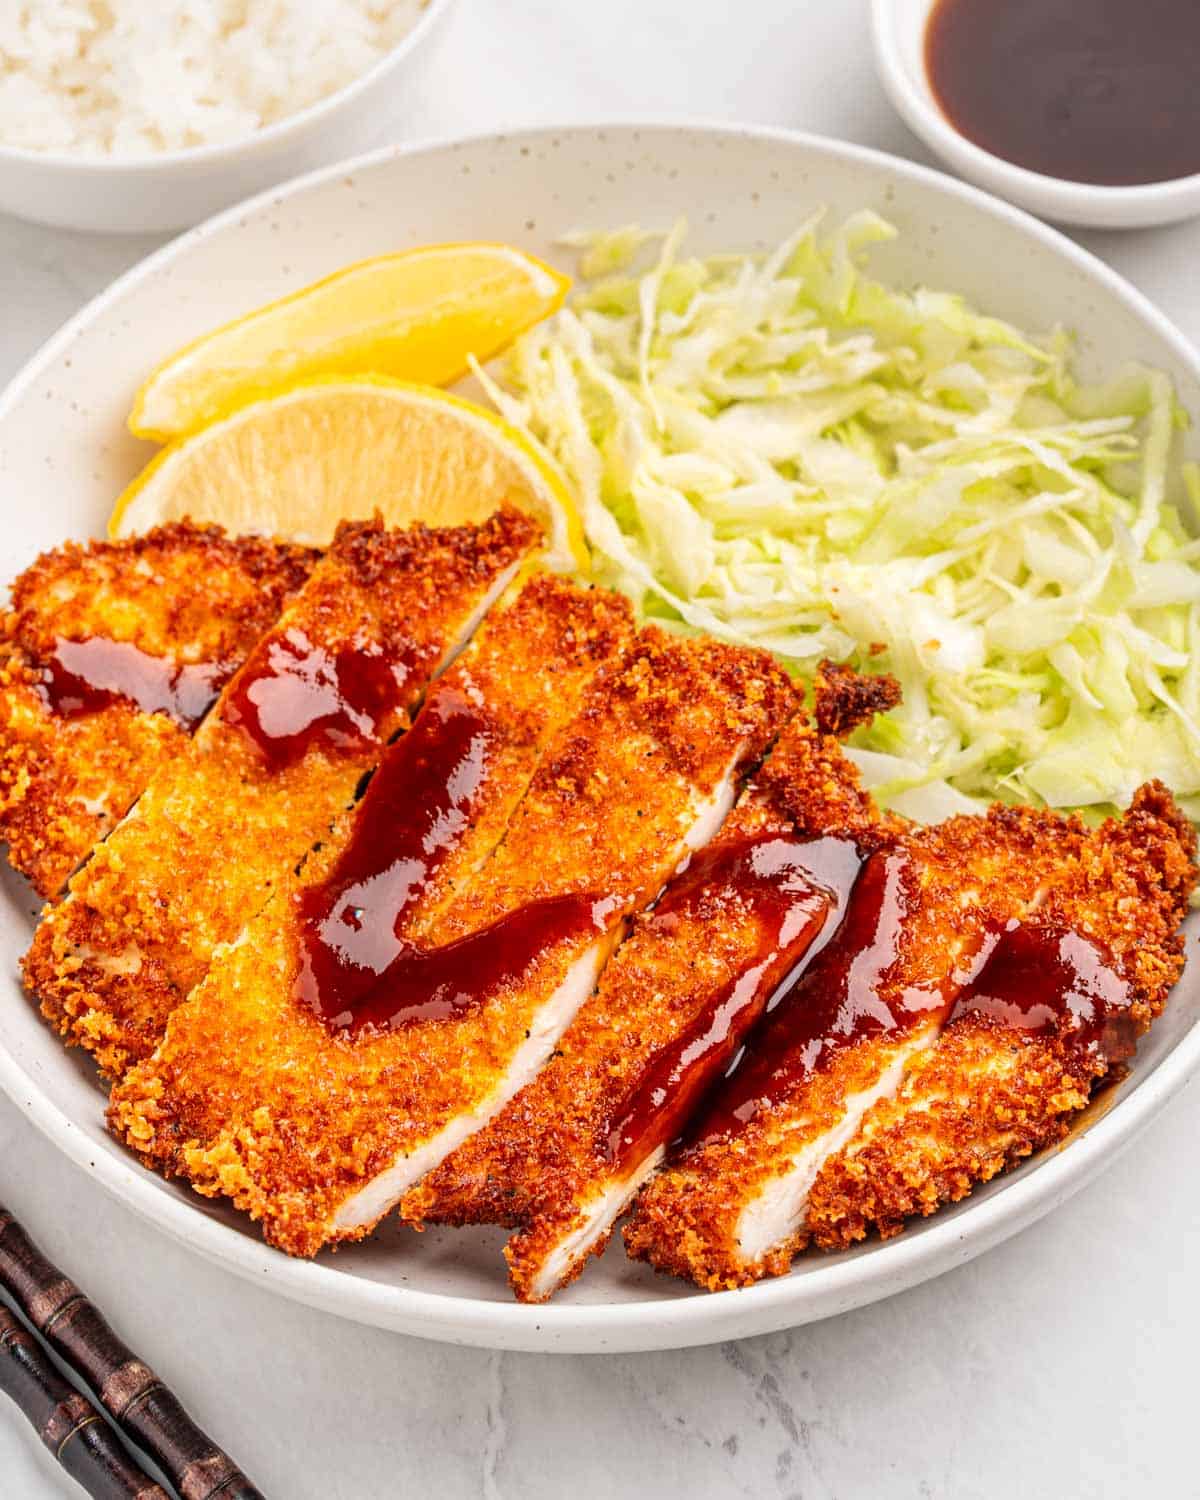
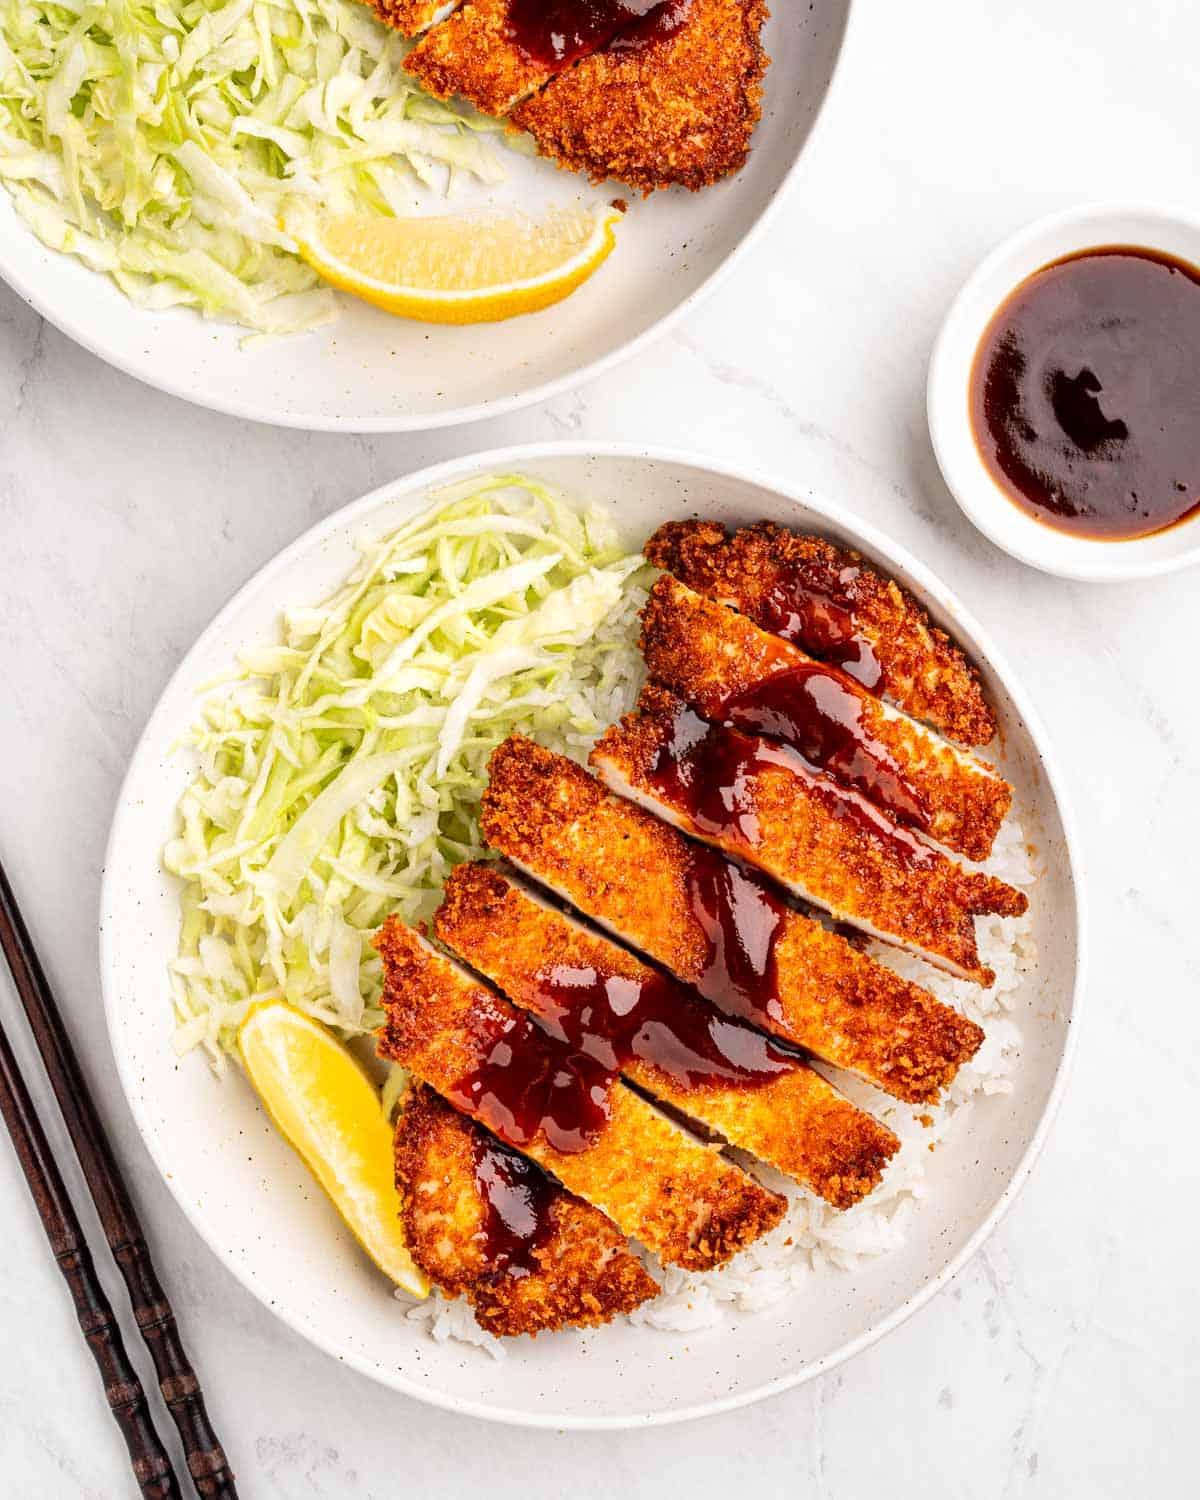
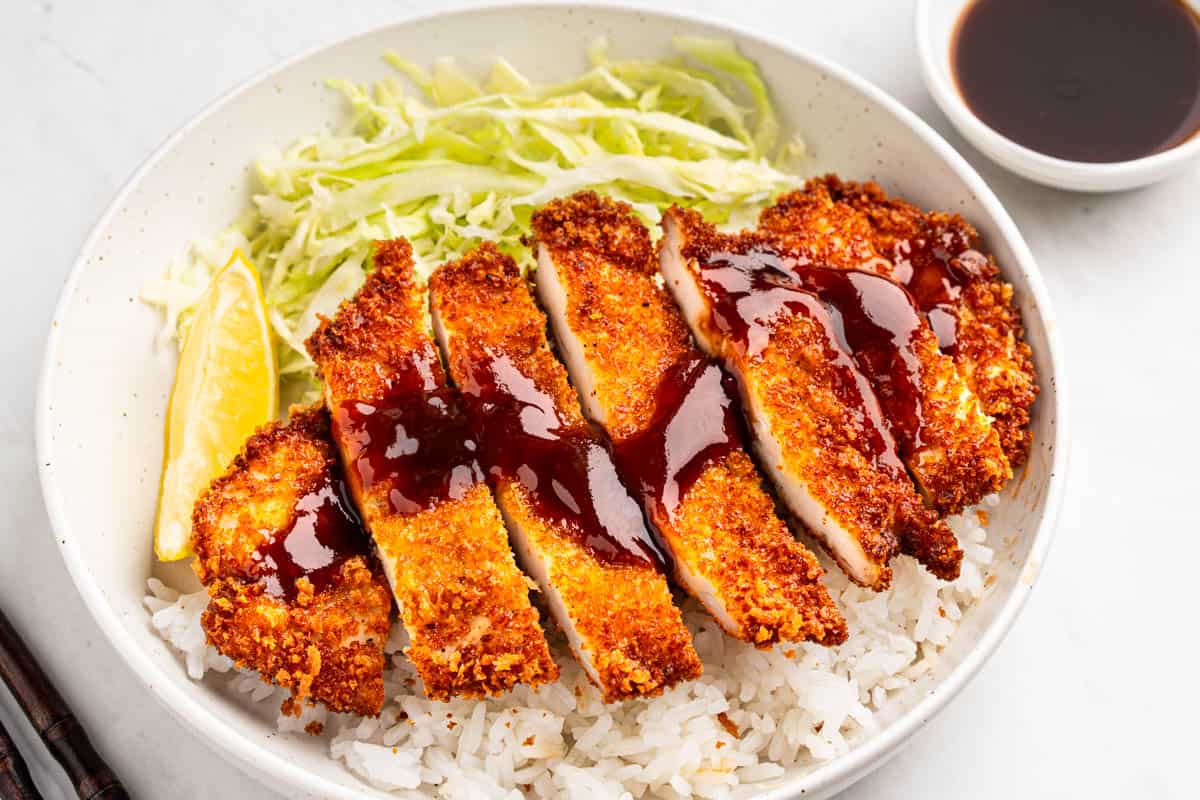
- Rest and slice – Let rest for a few minutes, then slice and serve with sauce, cabbage, and rice.
Tips for Crispy Chicken Katsu
✔️ Pound the chicken evenly – It cooks faster and more evenly this way.
✔️ Add oil to the egg – Helps the panko stick and crisp better.
✔️ Season every layer – A pinch of salt in the flour and egg mix makes a difference.
✔️ Don’t overcrowd the pan – Give the cutlets space so they don’t steam.
✔️ Use fresh panko – For max crunch, look for panko in the Asian aisle or bakery section.
Baked or Air Fried Chicken Katsu
Oven Method: Preheat your oven to 400°F (200°C) and place the breaded chicken on a wire rack over a baking sheet. Bake for 20-25 minutes, flipping halfway through, until golden and cooked through.
Air Fryer Method: Preheat your air fryer to 375°F (190°C) and spray the breaded chicken lightly with oil. Air fry for 12-15 minutes, flipping halfway, until crispy and fully cooked.
What to Serve With Chicken Katsu
Chicken katsu is a meal that goes with just about everything. I like to keep it classic with a side of steamed white rice and a pile of thinly shredded cabbage—bonus points if you drizzle on a little sesame dressing or a squeeze of lemon. A bowl of miso soup or a quick cucumber salad is perfect for something light and refreshing on the side. Want to turn it into a katsudon-style rice bowl? Just top it with a fried egg and call it dinner. It’s also amazing served with a rich, savory Japanese curry for a full-on comfort meal. And of course, don’t forget the katsu sauce—you can use my homemade version or grab your favorite store-bought bottle.
How to Meal Prep or Make Ahead
Chicken katsu is great for meal prepping since you can make it ahead of time and store it for later. After frying the chicken, let it cool completely, then store it in an airtight container in the fridge for up to 3 days. To reheat, pop it in the oven or air fryer to bring back that crispy texture.
You can also fridge or freeze the breaded, uncooked chicken cutlets for future meals. After breading the chicken with flour, egg, and panko breadcrumbs, place the cutlets on a baking sheet lined with parchment paper. Cover them with plastic wrap and refrigerate them in the fridge for up to 24 hours. For longer storage, freeze the breaded chicken for up to 3 months. When you’re ready to cook, fry them after thawing, and you’ll have crispy, delicious chicken katsu in no time!
How to Store and Reheat
Fridge: Store leftovers in an airtight container for up to 3 days.
Freezer: Freeze cooked cutlets (without sauce) for up to 2 months.
To reheat: Bake at 375°F until heated through, about 10 minutes. Or pop it in the air fryer!
Crispy, Golden, and Totally Worth It
Chicken katsu is one of those recipes that never gets old. It’s crispy, comforting, and so easy to pull together. Once you’ve made it once, it’s bound to end up in your regular rotation. Whether you’re making it for the first time or adding it to your weeknight dinner plans—this one’s a keeper.
Let me know in the comments if you make it, and don’t forget to pin it for later!
RECIPE

Chicken Katsu
Ingredients
- 2 boneless, skinless chicken breasts
- 1 teaspoon salt
- ½ teaspoon pepper
- 1 cup all-purpose flour
- 2 cups panko breadcrumbs
- 2 large eggs + 1 teaspoon neutral oil
- neutral oil (vegetable, canola or peanut oil)
For Serving
- tonkatsu sauce
- steamed rice
- shredded cabbage
- lemon wedges or sesame dressing
Instructions
- Prep the Chicken: Slice each chicken breast in half horizontally to create 4 thin cutlets. Place each piece between plastic wrap and gently pound to ¼-inch thick. Season both sides with salt and pepper.
- Set Up Breading Station:Place flour in one shallow bowl. Beat eggs with 1 tsp oil in a second bowl. Place panko in a third bowl.
- Bread the Chicken: Dredge each cutlet in flour, shake off excess. Dip in egg, then coat thoroughly in panko, pressing gently to help it stick.
- Fry: In a large skillet, heat ½ to ⅔ inch of oil over medium-high heat (around 350°F). Fry each cutlet for 3–4 minutes per side, or until golden brown and cooked through. Transfer to a paper towel-lined plate.
- Serve: Slice chicken into strips. Serve with katsu sauce, shredded cabbage, and steamed rice.
Notes
- Pound the chicken evenly: Ensures even cooking and helps the meat stay juicy.
- Season everything: Add a pinch of salt to the flour and eggs to layer flavor.
- Add oil to the eggs: Helps the panko stick better and crisp up beautifully.
- Don’t overcrowd the pan: Fry in batches for even browning and to avoid soggy coating.
- Let it rest before slicing: Keeps the juices in and the coating intact.